

Hey everyone. I'm planning to do a Snorlax cake for an upcoming birthday (Snorlax is a Pokémon cake for those unfamiliar) and was wondering if anyone had any ideas about how I should do this? I was just going to pile some cake together and start carving but if anyone has a more organized plan for it I would appreciate any advice!
Also, should the head be cake? Rice krispies treat? Foam dummy?
Thanks!


I love Snorlax!! He is my favorite Pokemon! ![]()
You could do the soccer ball cake and then his head and limbs as Rice Krispies. I seriously want to make a Snorlax one now!!
Good luck and please post pictures when you are done!
Haha he's my favorite too...he's by far the cutest Pokémon in my opinion. How would you attach the arms? They seem to be just big blubbery flaps but I'm not sure how I would anchor them to the cake. I was also thinking about making cookies shaped like other Pokémon and having them orbiting Snorlax but that might be too much work.
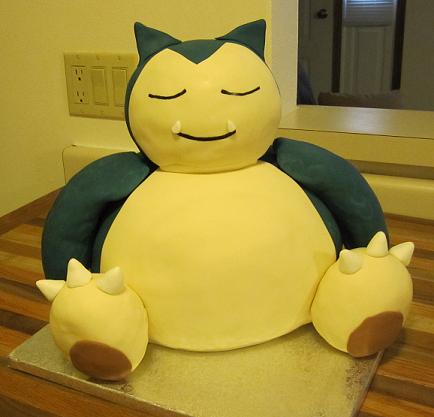
Well, I made him! His construction did not go smoothly, it just seemed to be one of those cakes where everything goes wrong...broke the wire on my leveler, had to use a serrated knife and then sliced my thumb open. I was pretty pressed for time so he's not as neat and clean as I would like, but oh well.

I don't meant to be a pain, but is there anyway you can give me a mini-tutorial on how you made this cake? Just the basics, what pans you used, how many, what you made the head and feet out of. I want to make a similar cake for someone's birthday, but I have never made a shaped cake before!
Sure, thanks for the comments! He is actually very, very simple.
I carved 2 6" rounds into a sphere for the head. I used 4 10" squares for the body and carved those into the general body shape of Snorlax (which is nearly spherical). I would use 10" rounds in the future because the squares created a lot of scraps which then of course meant that I had to eat them.
I used rice krispies treats (just the store bought kind) for the feet and arms and attached them to the body using skewers. I used little bits of white fondant for the nails and attached them with water, and the lighter patches on his feet I simply cut small patches of ivory fondant and attached them with water.
For the fondant, I used blue Satin Ice and quite a lot of trouble getting it to the proper color. I think I ended up adding some green Americolor gel and finally kneading in a bit of black Satin Ice. For the light parts, I used white tinted with Ivory.
In terms of internal support, I put the 6" head on a cardboard circle cut to fit. Within the body of the cake I put several plastic dowels (just the Wilton kind, I think I used 3) and placed the head on top. I then sharpened a long wooden dowel and cut it to a length just slightly shorter than the height of the entire cake and pounded it through the center of the cake to hold the head on (I then covered this hole with his ears). If you use a good, sturdy cake recipe, he will be surprisingly stable.
These are things I would do differently next time:
Not use Satin Ice. I had a really difficult time covering the spheres with Satin Ice as it dries out too quickly for me and I ended up with a lot of elephant skin areas. I would recommend Fondarific because it stays pliable for much longer and would make it significantly easier to cover a sphere.
I ran out of the blue-green fondant because I didn't tint enough so his ears aren't as full as I would have liked.
I would have made the arms shorter.
Since I was short on blue-green fondant, I left bare patches where I put the ivory fondant for his belly...don't do this. It made visible lumps underneath the ivory fondant and didn't look good. I would cover the whole body in blue-green, THEN attach the ivory patches with water and smooth the edges down.
Hopefully this is helpful, if you have any further questions send me a message and I'll try to explain further.
Ooh, I nearly forgot. I drew the eyes and mouth on with edible black marker and used bits of white fondant for the teeth.
If I had done it over, I probably would have used very thin ropes of extruded black fondant to give a more 3D look for the eyes and mouth.
It's soooo cute - great job![]() I LOVE Snorlax - I'll save your cake for inspiration to do one in the future
I LOVE Snorlax - I'll save your cake for inspiration to do one in the future![]()
Quote by @%username% on %date%
%body%
