


Need Help With Realistic Car Cake.
Decorating By BakingGirl Updated 3 Nov 2009 , 8:47pm by letsgetcaking

My 5 year old has requested that his birthday cake to be a cake version of my husband's car, which is a tricked out Mustang. Now my husband is my harshest critic, if there is a flaw to be seen he is the first one to spot it, so the pressure is on to get it right. I have ordered Mike McCarey's car cake DVD but it is not going to get here in time, so I need some expert help from you guys.
I have made a few "cartoony" car cakes but this is my first realistic car cake. I am fairly comfortable with the construction but it is the finishing I am a bit unsure of. What colour is the best for the windshields? Is it best to have a black or dark colour to make them "disappear"?
I also would like to have a shiny finish like on a real car, so was thinking airbrushing would be the way to go. The problem is the car is bright orange with a black hood stripe and black trim. How do I airbrush one area without getting colour on the other? I was thinking of applying dark fondant over the window areas, then a layer of white and then cut out for windows. Then airbrush the cake orange, but how do I avoid the windows? Then I apply a black hood stripe - but how do I get that to be shiny. If I airbrush or paint it with water to make it shiny won't it run and stain the orange?
Any pointers would be great, thanks.

It's really too bad that you won't have Mike's DVD...It's fantastic! I can tell you how he does it (I've watched the DVD a thousand times). For the windows and windshield, he uses modeling chocolate and then rolls out a thin strip that goes underneath the fondant. Then, after covering, he "reveals" the windows by cutting them out just to the modeling chocolate. He used a black/dark gray color for the windows.
He also airbrushes the color on the car after he's finished just to enhance the color. Use a stiff piece of cardstock or something else to "mask" where you don't want color (takes a little practice...). Good luck!
Go to this link on Flickr; Bella helped me out a lot with my car cake and I used Mike's Car DVD as well!! Bella is also a member on CC as well!!
http://www.flickr.com/photos/37331318@N08/sets/72157619119013020/
Thank you so much for your helpful replies! Great photo tutorial aundron, thanks for the link!
2muchsugar, since you have seen the DVD, did Mike pre-colour the fondant that went on the cake, or did he airbrush the colour from white?
Also, is there a good reason for using modelling chocolate for the windows under the fondant, can I just use fondant instead?
Mike had pre-colored fondant, but he airbrushed it at the end of the video to give it a more realistic look.
I forget why he used the modeling chocolate; I think it had to do with the fact that modeling chocolate gets harder than fondant and it's easier to carve out the shape of the window. (don't quote me on this, ![]()
![]() )
)

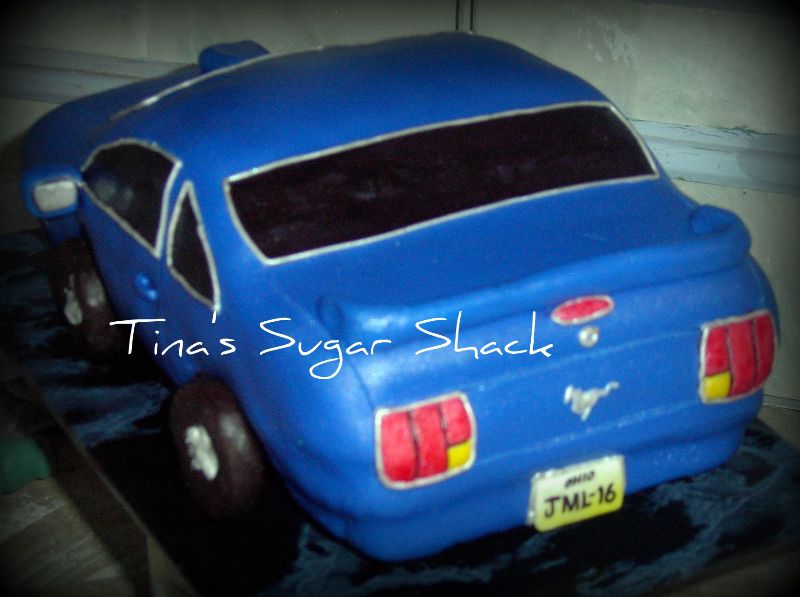
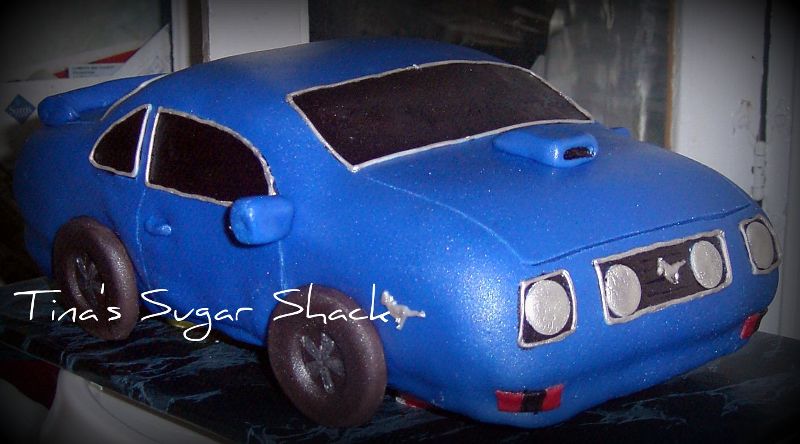
Here's a mustang I did, just so you can get an idea of what the black windshields look like. I wasn't happy with the overall look of this cake ( I wanted to shave down some of the hood seemed bubbly to me) I told the customer they would have 1 or 2 less servings/ or have it bubbly looking and they said, bubbly ![]() so that's what I did.
so that's what I did.
just wanted to say, using an exacto knife to cut in the details of the doors, and lines for the trunk etc. really helps to give it a more realistic look
If i were you, I would airbrush the whole thing orange, then reveal the windows, then using a paintbrush and black airbrush color, paint on the black stripe, then let everything dry and airbrush the whole thing with some pearl spray to give it that new car sheen (gives that glittery paint effect on the car), hard to see in my photos, but I used that on this car too.
I believe his reason for using modeling chocolate is that it doesn't distort like fondant does (like already mentioned, it is a different consistency). He also uses modeling chocolate for almost all of his decorations. You could easily use fondant instead, but just be careful not to cut through both when carving out the windows.
http://www.automobilemag.com/am/2009/ford/mustang/360_views.html
here is a site that gives you a 360 degree view (just click and drag over the car to turn it) that I used that's very helpful with all the detail lines.
Oooooh, KHalstead, I see the sparkly finish on your cake. That is beautiful!! Did you mix in pearl dust with the airbrush colour. I have never dared to do it as I am scared it would make the airbrush clog up. Thanks for the tips on the sequence of painting the cake, that makes sense and it is what I will do!
Thanks again all of you, so nice to know that there are people to help you out when the post is slow and DVD's don't get here on time. I have some chocolate melting right now for some modeling chocolate, there is a first time for everything!
I used an actually pearl airbrush color. I haven't had good succes with using alcohol with the luster dust (it clogs my airbrush, and is a pain to clean out)...unless I use mostly alcohol and then it doesn't look as sparkly as I like it. So I wound up ordering pearl airbrush color, I got an 8 oz. bottle (like the size of those squirty ketchup and mustard bottles) for like 11 dollars, felt like a real expensive item at the time, but I've had the bottle for over a year now and use it on almost every single cake (even on white cakes, it makes them have a nice silky sheen to them I love it) and I'm barely down half a bottle!
I did not know they made pearl airbrush colours, how cool. In all honesty I have barely used my airbrush, such a pain in the butt cleaning up after it. I need to get one of those airbrush cabinets made. I have an open plan kitchen which means I find a fine film of colour everywhere afterwards. Outside is still too humid for airbrushing, tried it before and my cake pretty much melted.
I just wanted to say a big thank you to you all! I could not have done it without your help. My DVD turned up today, so I guess I can watch it and be prepared for next time.
Here is the finished result:
http://www.cakecentral.com/modules.php?name=gallery&file=displayimage&pid=1506862
Wow! It turned out amazing! You must be proud of this one! I bet both your husband and son loved it!
Quote by @%username% on %date%
%body%
