


I use a craft knife and take at least three 'cuts' to get all the way through. The top and bottom surface are much harder than the middle, so I cut through the top, go back around once or twice for the middle and then cut through the bottom. It seems to take a lot less time with multiple cuts than trying to get all the way through at one time. If I am using 1/2", I would probably go at least one more time.
Hi everyone! All of your stands are gorgeous! I have to make one for a friend's DD's 1st bday and I'm nervous! It has to hold 50 cuppies and a 6in cake on top. I think I'm going to do cake drums, but I don't know what to do as the center support and how do I attach them so that they will properly support everything? Please Help!

Visit your nearest acrylic shop. They will cut any size square or round you want. They also have clear sticks of acrylic they will cut to any length for legs. They also have the large clear tubes that can be used in the center. They sell a bonding agent that melts the acrylic a bit while you hold it into position. It is very sturdy. I have an 18 inch square cake stand that I made this way. For cupcakes I would recommend added a 14 inch with 4 of the clear legs one on each corner. Add a 10 inch and 6 inch making them the same way. Let me tell you these cake stands come in so handy when you want to add flowers all the way under and around a cake. You can see through it and it is beautiful with twinkle lights. They hold so many cupcakes too because you don't just use the edges if the legs are high enough. I hope this idea helps.

let's see if it works now...
http://www.cakecentral.com/cake-photo_1389879.html

I bought some craft wood to make a multi layer stand! I'm excited about starting it! ![]()
My plan is to have several layers that can be added or removed, so I have wood squares of 20, 16, 12, 8, and 4 inches. In the bottom of each will be 4 holes for the kitchen cabinet knobs to be screwed in as legs so that either size can be used as the base! There will also be a way to screw a wooden post in between layers so that they will be very stable when all hooked together. It is intended to be a cake stand, but can serve as a cupcake stand just as easily. I'm going to paint it all white and change the ribbon around the sides of the boards to match whatever is going on them.
My Dad has a great idea for putting all this together, so hopefully it all works out fine!! ![]() I'll have to post pictures as I'm sure I did a horrible job of explaining all that!!
I'll have to post pictures as I'm sure I did a horrible job of explaining all that!! ![]()


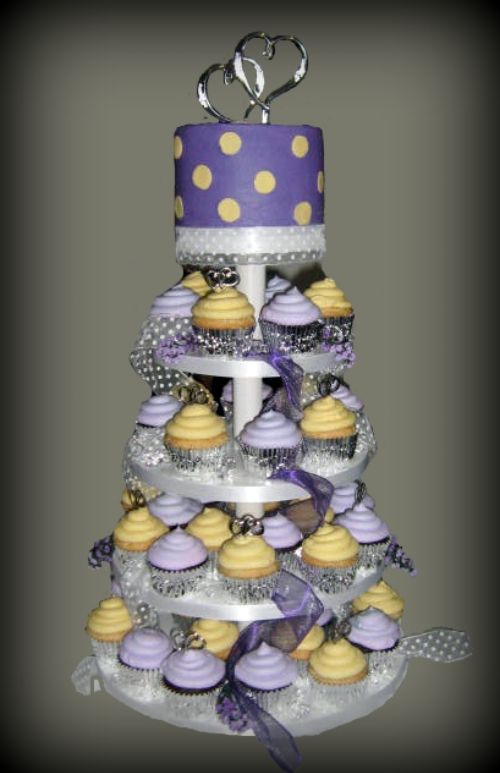
Here is my contribution ![]() Made for a wedding, used cake drums, 18, 16, 14, 12, and 10. Threaded them on a 1/2 dowel rod anchored into a 1/2 piece of plywood. The spacers are plastic bowls from GFS with holes drilled in them to be able to thread them on the dowel rod. Used one right side up and then put one up side down on top of it to create a globe effect. Also threaded a string of 50 mini lights, 10 in each set of bowls, so it was lighted. Thought it turned out nicely, planned to put a 6 in cake on top, but in the end did not think it was sturdy enough. Held the cupcakes just fine and for an evening wedding reception, thought it was pretty lighted.
Made for a wedding, used cake drums, 18, 16, 14, 12, and 10. Threaded them on a 1/2 dowel rod anchored into a 1/2 piece of plywood. The spacers are plastic bowls from GFS with holes drilled in them to be able to thread them on the dowel rod. Used one right side up and then put one up side down on top of it to create a globe effect. Also threaded a string of 50 mini lights, 10 in each set of bowls, so it was lighted. Thought it turned out nicely, planned to put a 6 in cake on top, but in the end did not think it was sturdy enough. Held the cupcakes just fine and for an evening wedding reception, thought it was pretty lighted.
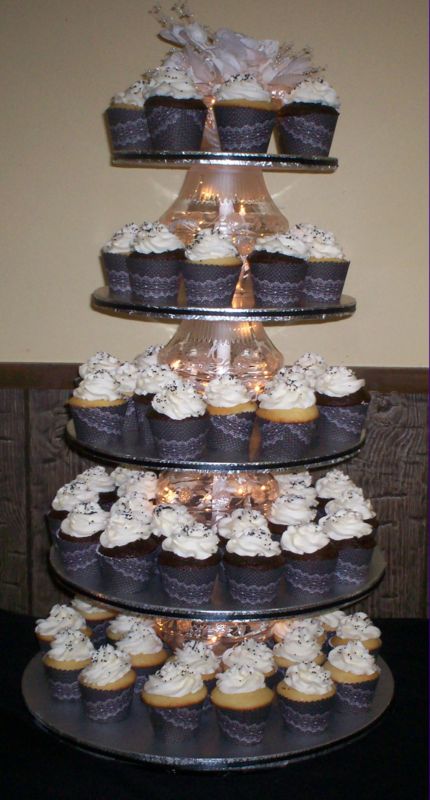
Thanks, I thought the lights really added a lot to it.

Here is mine! I finally made one! I got the instructions from CakeJournal .com. It was super easy! I used half in foam core for the circles, as well as the middle supports (they are about 4 in. in diameter). I covered them with gift wrap and ribbon. I can't wait to put it into use!
It can hold about 45 cupcakes, give or take since I measured using empty cupcake liners!

Here is one that DH made for me it isn't connected together, so I can use as many or as few tiers as needed. Simple to build, easy to use, and is sturdy too.

Here is one I just made for my Dad's upcoming birthday. I made this BEFORE I ever made a cake..haha..My SO is worthless when it comes to handyman stuff. I was raised in a family of handymen and I can tell you that I have often wondered if I could live with a man who isn't...it just isn't right...and he can't cook either, so we eat out most times because I'm NOT going to cook all the time or even most of the time..back to regular programming:
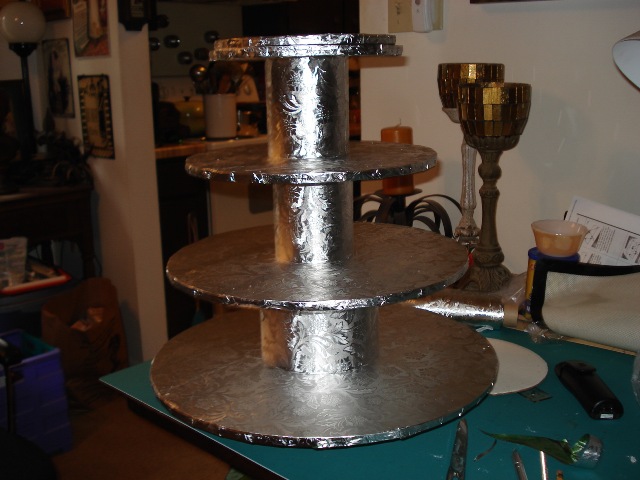
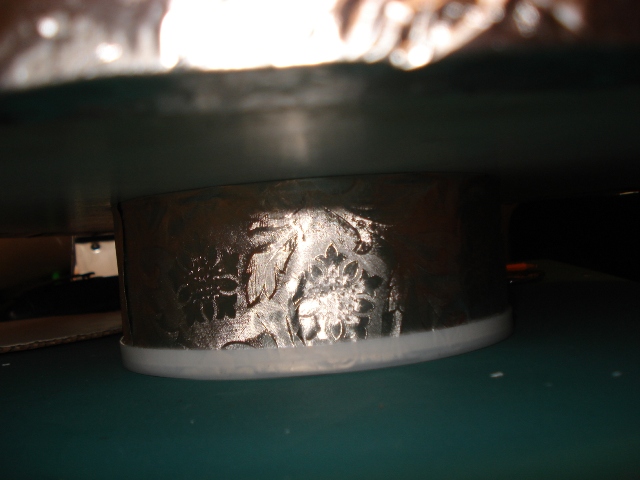
This cake stand is made of foamcore for the levels and 2 peach cans and 2 coffee cans. I used tin snips to cut one of the coffee cans about 2" high (get the large tin snips and cut the rim off the can first save the lid). Then I drilled a hole in the center of each can. I ran a threaded bolt down the center through all foamcores and cans with a wing nut in the bottom coffee can. I placed a bag of beans in the bottom coffee can and put on the lid (see the pic) after screwing everything tight. I also put a bag of beans (these are easily removed but I liked having it weighted) in the second coffee can and put the lid on it and ran the threaded bolt through the lid. This can be taken apart and store easily. The two top spacers are the same height but don't look it in the picture. I covered everything with florist foil.
Items needed for this stand
4 sheets foamcore
1 threaded bolt (I cut my threaded bolt because it was too long with dremel)
1 wing nut & one regular nut
tin snips or a way to cut one coffee can (the base of the stand)
The wing nut is in the bottom and the regular nut is at the top counter sunk through ONE of the double foamcore boards (all levels are double foamcore). I left a tiny bit of the bolt sticking up (read this on another forum) and covered it with aluminum foil that I had put a tiny dab of glue on. My cake board is double layer foamcore and the bottom layer has a small hole in it so that when I place the cake on top it can't shift but it's not sticking into the cake. I covered the bolt that stuck up with foil just because it looked better.
When finished using all you have to do is unscrew and pull the bolt out and the cans fit inside each other.
Oh, please excuse the mess, I had just finished the stand and hadn't put away the tools or cleaned up.


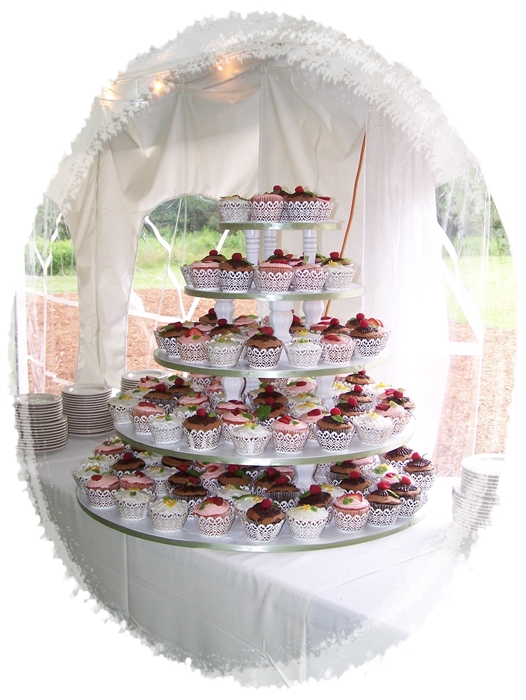
I'll make my contribution here as well!!
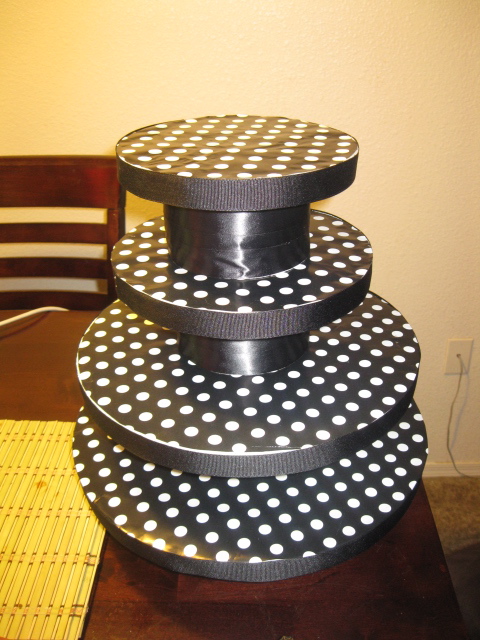
Here is one I made.......I charge $10.00/tier deposit on it (cost me $10.00 to make, but took me a while) so I've only rented it out twice, because people think it's too much to pay ( IT"S A DEPOSIT!!.....YOU GET IT BACK!!!) anyhow........here it is.
I did this stand yesterday for a friend's son's graduation. The center supports are clear plastic paint type cans from Michael's, filled with material of the three school colors. The school colors are also the ribbon going around the edges of the boards.
Well, I figured out HOW to post a picture to a forum from Tina (KHalstead) but now I have to figure out HOW to make it bigger! ![]() If you go to my photos you will be able to see this better.
If you go to my photos you will be able to see this better. ![]()

This was done with a 24" board & 3 4" cake dummies (6", 12" 18") all wrapped in fancy paper then I stacked & glued them together.


Wow Montrealconfections, very nice! I think that I'm going to use this idea.
How did you make your KHalstead, if you don't mind me asking? I like yours also.
I made two--one is made from acrylic and the other is made of plywood and flour pots. They're too big to upload, but they're in my photos.


How did you make your KHalstead, if you don't mind me asking? I like yours also.
Forgot to mention, the stand is adjustable...I can use it with only 2 tiers, 3 tiers, 4 tiers, etc. It comes apart easily, and I also have different lengths of dowels for the center columns so if I have cupcakes that are taller or have a bigger topper on them I can adjust the height too........so this is definitely NOT a one time use type of thing!
Here ya go!
I bought MDF wood (medium density fiberboard) you could use plywood or anything else you wanted to use. MDF is very heavy, I bought 1/2" thick, but again any thickness you want is fine (I got 1/2" thick so I could use ribbon around the edges). I used my cardboard cake boards as a template to trace an outline onto the wood. Then using a jigsaw, I cut them all out, cutting just on the outside of my outline.
Once they were all cut out I used an electric sander to sand the edges up to my outline, making sure they were nice and smooth and that the whole thing was evenly round.
Then I used a drill and drilled a hole into the center of each round I had cut out (the hole needs to be just slightly bigger than the size of your center rod, my center rod was 3/8").
Then I bought a length of dowel that was 2" in diameter (I think it was a 2 or 3 ft. section), and cut it into 4" length and some into 6" length (for when I need more space between the layers of the stand). i drilled a hold through the center of each of the sections of dowel (it's easiest if you start on one end and drill a hole to the center, then flip it over and drill from the other side to the center, until your holes meet), the hole doesn't have to be "perfect" but you should attempt to make it at straight as possible, you can adjust the dowels before tightening the stand if they're not perfectly straight.
I bought a 3/8" nut for the bottom of the stand and a 3/8" t-nut for the top of the stand (this is a nut that has a flat top with three teeth that you pound the nut down into the hole and the teeth grab into the wood making it a permanent fixture with the wood, since my top is almost always the 6" board I just put the t-nut into that board and it allows a cake to be placed on top without interfering).
Then it was just a matter of screwing the center threaded metal rod (mine was 3/8" in diameter) into the bottom tier of the stand with the regular nut going underneath the bottom board (the nut will still stick out so I cut an extra 8" round and cut a large hole in the center to use as "feet" for my stand to sit on to alleviate the fact that the nut sticks out of the bottom, or you could just glue on some permanent feet, but I wanted to be able to change up what size the bottom layer would be depending on the numer of cupcakes i was using the stand for.)
Then just slide on one of your dowels onto the metal rod, then slide down the next sized board, another dowel, etc. until you've reached the desired height of your stand. Once you have the top board on (you'll have to thread it down because of the t-nut) and everything is nice and tight, then take a marker and mark the top of the top tier on the metal rod (there is no measurements for the metal rod because it all depends on how thick your wood is and how tall you make your dowels)...then remove the boards and dowel and cut the metal rod with a hacksaw a couple threads below your mark. You don't want the metal rod to stick up but you want enough that it can screw into your t-nut on top.
Then you can prime and paint the stand, I use spray paint and spray primer, for paint I use a semi-gloss so it's easy to wipe clean once it's been used. It's best to do several coats so if you get a scratch on the stand it won't show as much. In order to attach the ribbon to the edges (double sided tape won't stick to mdf) I use a hot glue gun, or extra strength glue dots for a more shear ribbon (note, when I use a sheer ribbon, I put a white satin ribbon on first, then the sheer ribbon because the edge of the mdf board doesn't take the paint as well as the rest of it)
Hopefully these instructions are clear enough, if you have any questions feel free to pm me or email.
Good Luck,
Tina
Quote by @%username% on %date%
%body%
