


I have decided to make a tutorial for a Microsot Publisher collage.... I am trying to make it as basic as possible with little to NO technical jargon..... Hopr this helps some of you.....It has taken me about 3 hours to do.....
Open Microsoft Publisher. The first thing you will have to do is choose a template. Select Blank Publications. Then click on the first image - full page. 
After you select this you can change the orientation or size of the page by clicking File then Page Setup. 
(For this tutorial I did 8 1/2 x 11 but in landscape, for my collages I usually do 12x12)
Next open your picture folder so you can find your cake photos.
Select all the photos of the cake you are working on. Click once on the first photo, depress and hold the shift key, and click on the last photo. All the photos should now have blue highlighting. Release the shift key.
Click and hold on one of the photos and drag it to your Microsoft Publisher window. This should move all the photos to the document.
At this point I resize all my photos so I can compare all of them side by side and choose the best ones. when you click on a photo small circles will appear on each corner. Choose one corner, click it and hold the mouse button while you drag toward the middle of the photo. You will be able to crop out bad parts of the photo in the next step. Focus for now on getting all the photos to a manageable size. 
Now you can delete any bad or blurry photos. The selected photo (with the dots on the corners) is about to disappear from the screen shots. It has a big glare from my camera flash.
Now you can crop a photo to make it smaller. Click on the little black line shape in the picture toolbar. It will make black corners appear on the selected photo. You can grab (click and hold) one of these and pull it in to cut off part of the picture. If there is something special you want to highlight like a figure or flower crop the photo down around the item and then you can resize it to make it bigger if needed. To exit the crop tool just click on the background of Publisher and the corners should turn back into circles when you click on a photo again.
Just like in most windows based programs, when you right click a menu pops up. This is an important tool in Publisher because it allows you to change the order of a photo. (And lots of other things) I used it here to bring the bottom photo forward to the front so it is covering the bottom corner of the upper photo. I will use this again in a few steps.
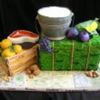
Now I have my photos looking about right I need a nice background. I am going to do a plain cranberry colored background for this one. On the left side of the window should be a vertical toolbar, click the Rectangle shape (see red arrow). This tool allows you to draw a rectangle that you can color and it makes a great background.
Click on a corner of the page and drag across to make the rectangle, resize it to the size you want just like you did the photos. Now it will be on top and if we add our color it will hide our photos! So let's send it to the back. Right click on the new rectangle (you will know it is selected if you can see those little circles on all the corners-green arrow). In the menu, choose order, then choose send to back. This makes the rectangle the back most object in the document.
Now, let's add the color. Right click on the rectangle again- check for those circles. Choose Format AutoShape. A new window will pop up. Click on the dropdown menu (should say No Fill) at the top in the area entitled FILL. Choose your color from the menu, if you don't like the colors they offer you choose more colors.... (red arrow in my screen shot). 
In this menu you can also play with the line features to add borders to your collages. The green arrow is color choice, blue is the style of the line (single, double , triple) and red is the size of the line. the higher the number the fatter the line. Have fun with it!
Now it is time to add a text box if you want to..... Select the text tool in the side bar, red arrow.
Draw the text box the same way you did the rectangle before. Then choose the font and size you want up in the top bar just like you would in most word or office document programs. I usually start out with a huge box and then make it smaller. I also usually use a font size of at least 48 so that it will be able to be seen in the gallery.
Type your text and move it into place. You can also angle it (or any of your photos) by grabbing the small green dot and swinging your mouse to the left or right.
Save your file as a .pub file so you can make changes later.
Then save your file as a .jpg so you can shrink it and upload it.
Now you are ready to resize you photo to post in the gallery or a thread. I use www.resize.it . That is what my screen shots are for, but you can use whatever website or program you are familiar with.
If you have a 12x12 photo collage choose advanced tools. Then for the gallery I type 1100 in the box where it asks what size pixel you want it to be. Otherwise with a landscape or portrait (8 1/2x11) chose the correct size and find your file. Pick to make it 720x 540. and click okay.
Once the website is done working over your image it will post and you can right click to save it. I always just save it as the same .jpg name I gave it in Publisher knowing I can go back and make changes in the .pub file if I need to. When you choose okay it will pop up a warning window about having a file by that name already, but just okay it. 
You are done with your collage and ready to upload it! Good Luck and please feel free to ask me any questions about the process.


Thank you so much! I have always wondered how to do that. What a lot of work on your part!
Thanks again!


Thank you very much - this is what i LOVE about this site, Someone is always more than willing to share for no reason at all other than to help the rest of us. I'm constantly learning.
Thank you again.


You're awesome! Thanks so much! This is going to come very handy.
Okay guys-- I made a tutorial for drawing cakes....
It looks really long but once you get the hang of it it goes fast and you will be able to add in drawing ribbons and stuff.....
http://forum.cakecentral.com/cake-decorating-ftopic-588301-0-days0-orderasc-.html
Okay guys-- I made a tutorial for drawing cakes....
It looks really long but once you get the hang of it it goes fast and you will be able to add in drawing ribbons and stuff.....
http://forum.cakecentral.com/cake-decorating-ftopic-588301-0-days0-orderasc-.html
You ROCK! Awesome! I am so excited about this haha. ![]()
![]()
![]()
FYI--- I tried it in Power Point and it looks similar. I didn't finish a cake but you can try the tutorial with it and see how it goes... the biggest thing I noticed right away is it doesn't look like there are odd shapes (for the diamond). But otherwise it looks doable!

There it is!!! Found it! It is down on the bottom edge under the heading autoshapes

Sorry this actually is helpful for the tutorial on drawing a cake.... my bad.
But I think you can do thses steps for the collage in power point. If you get stuck let me know....
Martha


Thank you-- I am glad it worked for you!!
ATTENTION EVERYONE!!!! I just discovered last night a way to avoid having to resize a collage if you are posting to the gallery (I think it would still have to be resized for posting in a thread).
Type in the name of your file and then click the drop down menu to change the format. slide down until you see .jpg. (red arrow) Select it.
Above the box to type the name it should say desktop printing. Click the change box to the right(red arrow). This should bring up a new window choose web (96 dpi) (blue arrow). Choose ok then save it. It should now be ready to go into the uploader on CC!! Yeah that saves several steps at the end.

Quote by @%username% on %date%
%body%
