

Filling Layer Between Two Sheet Cakes? Need Help W Timing
Decorating By extrahorizons Updated 21 May 2012 , 9:01pm by caleyb
I am making my daughters graduation cake, and I have confused myself!
I'm planning on baking two 12x18 sheet cakes tomorrow, and icing them on Saturday evening for the party on Sunday. I have never layered a cake this large, so I started reading about freezing the cake first, and now I don't know what to do!
The plan is to fill the layer between the cakes with raspberry filling, and I'm using all buttercream icing.
Should I crumb seal the cakes Friday after they are cool, then freeze until sat. Morning...
Then on Saturday, add an icing dam, fill and stack the cakes while still very cold.
Then...wait until room temp to finish the icing?
I'm also going to stack another 2 layer 9 inch cake on top of the sheet cake, but I'm treating it as a separate cake. I plan to use a cardboard support and dowel rods to support the round cake.
This is my first large stacked cake so any help is appreciated! Very much!!

First off, my advice will only work if your raspberry filling is shelf stable and does not need to be refrigerated. That being said, this is how I would do it:
Bake cakes on Friday, as soon as they are cool cover them with plastic wrap and let them "settle" for several hours. Fresh baked cakes are harder to handle and level. Place the wrapped cakes into the freezer for about 30 minutes and then remove and level. Add very stiff butter cream dam and then add your filling(s). Add second cake layer and crumb coat. My butter cream is always a crusting type so after mine has crusted well I add a piece of parchment on top and then place a weighted pan on it for an hour or two at least to make sure that if there is going to be a bulge that it will show itself at this stage. If bulge shows, fix it. Do the same for the round tier.
Let the cake sit overnight unrefrigerated. It had been kept covered and then crumb coated and does not have a refrigeration necessary icing or filling so no refrigeration is necessary.
On Saturday, add final layer of butter cream and smooth it out on both cakes. As you stated, make sure to add doweling to the area where the top tier will be placed. I usually stack my tiered cakes before decorating so that is what you will do next.
Just make sure that your board under your 12 x 18 is very, very sturdy or you will have issues with cracking, etc. HTH

I'm not sure why you'd need to freeze them? I generally bake 2 days before delivery, decorate 1 day before, then deliver on the date.
If you aren't using a perishable filling or buttercream, you won't even have to refrigerate them. Just fill and stack, wrap in plastic and allow to settle for a couple of hours, then unwrap and frost/decorate. I usually put a book or something on top to help it settle.
Thanks!
The only reason I was considering freezing is due to the size of the layers. I was concerned about the cake cracking while moving it.
I read the whole "weight with a ceramic tile" thread last night which shed some more light onto the whole process.
I think I will freeze the 2big layers for 30 mins then fill, wrap, weight etc.
Thank goodness it IS a stable raspberry filling. Whew! And I have a plywood base too!
The way to maneuver sheet cake layers that size is to have boards sturdy enough to hold them even in the preparation process. From baking to cooling this how I do it:
First, you need to having two heating cores or two flower nails in each 12 x 18" cake pans while baking in order to insure even baking. I prefer flower nails as they leave only a small hole whereas baking cores leave a large one and the plugs from inside the baking cores never seem to match up in size to the amount of cake missing.
Second, when cake are done, remove from oven and place on cooling racks in the pans for about 15 minutes. Since your cake is likely domed and not flat you cannot flip it out upside down without taking a chance it will crack. It needs to be quickly removed from the pan and then flipped right side up to finish cooling. To do this you need to have a sturdy prep cake base ready to help you flip. How I do this is to take 4 cardboard cake boards in the 13 x 19 size and cover them with press-n-seal (to hold them together as a unit and to protect them from getting dirty therefore allowing you to be able to use them again). Place cardboard cake board base on top of cake in pan, with oven mitts hold the pan and the board and flip. Remove the pan. Now immediately place the cooling rack on the bottom of your cake and using the cake rack and the cardboard cake board as your support now flip it right side up onto the cooling rack. Let cool this way until the cake is no longer hot. When my cakes are still slightly warm I loosely cover them with some plastic wrap or parchment so that they don't dry out.
Third, once the cakes are completely cooled, use the flip maneuver I described above to get the cakes onto the prep support cardboard cake boards. Wrap well with plastic wrap and leave on the counter to "settle" for a couple of hours. It takes cakes time to redistribute moisture and to firm up a bit. Once the cakes have settled then you can place them in the freezer for the 30 minutes and then take them out and level them. Only freezing them for 30 minutes does not allow them to get frozen all the way it just firms them up considerably and makes leveling, filling, and crumb coating much easier without the hassle of worrying about the condensation from a frozen cake.
For placement of the top layer of the 12 x 18, just proceed as normal with the cut leveled side of the cake down so that the smooth baked cake bottom will now be your cake top. I use a cake lifter to help me place my large cake layers onto bottom cake layers.
Hope this helps you out!
I use the nails as well, and turn it out onto a cooling rack as Heartnsync does.
I then slide the cake off the rack onto a cake board, fill it, and put the other layer on top, cut side down as previous poster. Then I wrap and weight down, generally overnight, then crumb coat and decorate the next day.
I find that the cake slides readily off the cooling rack, so I don't have to pick it up. I just pick up the rack, hold it at about a 45 or so angle to the board, and gently slide it off. The front edge gets lined up where I want it, then I keep gently moving the rack back so the cake slides off onto the board (or the filling, depending on which layer I've got.
I HATE picking up large cakes. Everything bigger than 10 inches is done this way, and I've never had one break.
Thank you so much for the help! Both cakes are sitting on the counter - crumb filled, raspberry and chocolate filled and weighted to help settling. Whew! It was a huge job to make all these in one day.
I do notice an overly large gap between the two sheet cakes. I think I put the icing dam in a bit too far, and they probably weren't as level as they should be.... But hey, that's what icing is for, right? ![]()
I also see a tiny bit of the fudge filling leaking out, but I suppose I can fix that before I ice them tomorrow. The fudge wasn't quite as yummy as the raspberry, so we decided to add a bit of raspberry to the top of the fudge...yum! It is so much better now. Gave it a bit of zing.
I hope the buttercream smoothing and decorating go as well tomorrow! I'm nervous it won't match my vision. But at least it will taste good.
........ notice an overly large gap between the two sheet cakes. I think I put the icing dam in a bit too far, and they probably weren't as level as they should be.... But hey, that's what icing is for, right? .....
OOOPPSS! NO that is not what icing is for.
What probably has happened by now is the cakes have cracked from not being le vel ![]()
...... a tiny bit of the fudge filling leaking out, but I suppose I can fix that before I ice them tomorrow. The fudge wasn't quite as yummy as the raspberry, so we decided to add a bit of raspberry to the top of the fudge...
I hope it wan't the combining of the raspberry & frudge that is causing the oozing ![]()
Did it leak much overnight? Were/are you able to just patch it w/more b'cream? Sure hope you are getting along o.k.
.......I'm nervous it won't match my vision. But at least it will taste good........
That's the best attitude to have![]() Seldom do our finished creation match our visions.
Seldom do our finished creation match our visions.
.
NO that is not what icing is for.
What probably has happened by now is the cakes have cracked from not being le vel
I hope it wan't the combining of the raspberry & frudge that is causing the oozing
![]()
Haha,.. So true! Actually nothing oozed or cracked overnight. Whew!
Even the fudge didn't leak, I could just see the dark color through a gap in the dam, so I filled it in a little more.
Let me say that making a cake like this was very hard work!!! I'm not sure $200.00 would have covered my time and effort. I have a much greater respect for professionals now. It is soo soo heavy too. I'll bet it weighs 30 pounds. That is a lot,of cake!
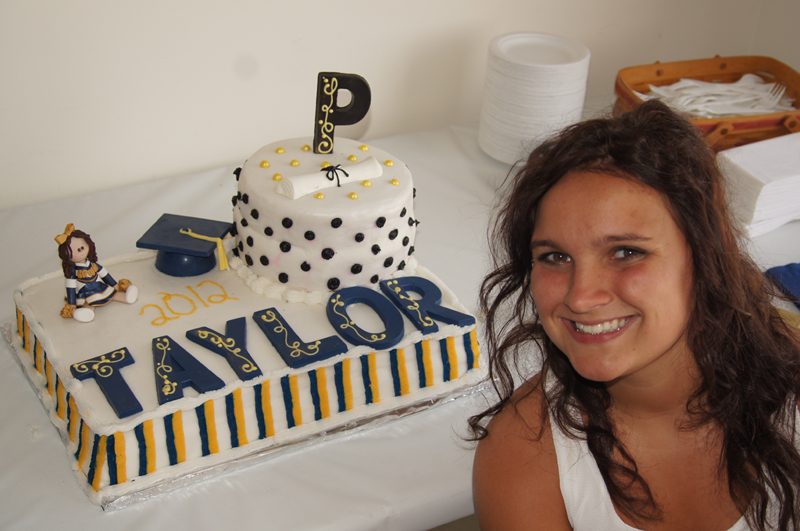
It's definitely not perfect, but overall I'm pretty pleased. The chocolate letters that I had made were huge...really big. They barely fit onto the cake after I added the round layers. I also had a little cheerleader made out of clay that looks like my daughter. She's gonna love it.
If I'm brave enough I'll post a picture. ![]()
Trying to add a picture! It shifted a tiny bit when we moved it to the garage, but it was 87 degrees and humid yesterday. It could have shifted ALOT more ![]()

Quote by @%username% on %date%
%body%