

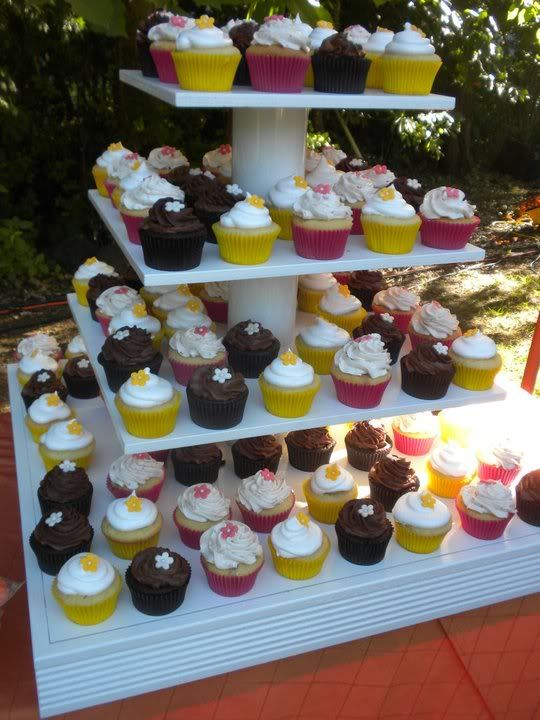
I posted a photo of my DIY cupcake stand and had several requests for more information, so I figured that I would share.
I do ask however that you build these for your own usage and not to sell. 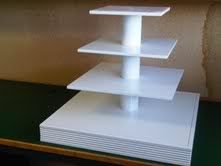
The assembled stand.
Now this stand is great because you can mix and match sizes in order to get a stand that is the perfect size for your event.
Materials
- 1 sheet of 1/2" plywood (standard US size of 4' x 8')
- ABS/PVC pipe (I used 3" diameter pipe)
- 3/8" Threaded Rod
- 2 - 3/8" Nuts
- Trim board or feet for your base
Start by cutting your plywood using the following diagram. One sheet of plywood will make enough pieces for two complete stands.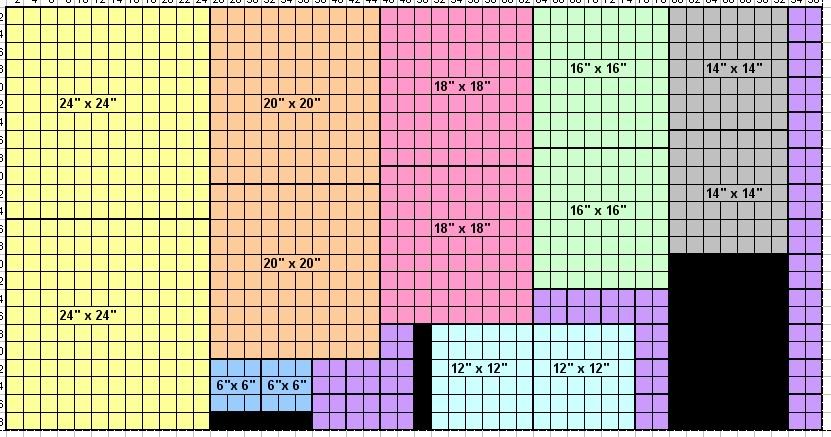
The purple sections on the diagram are going to be where you will cut your disks from so you don't actually need to cut the squares, just don't discard those pieces. The black pieces in the diagram are scrap pieces of wood, you will not need those.
Then you will want to cut your pipe to length. I like a little extra room for reaching in for cupcakes so I cut mine to 5 1/2" tall. In this step it is important to make sure that the cuts are level as this is what will keep your cupcake stand level as you stack it. I tried using a hand saw at first and found it made very unlevel cuts. Then sand your edges so they are smooth and level.
Measure the inside diameter of your pipe and purchase a hole cutting drill bit of the same size. Use the areas of the plywood marked in purple to cut disks. You will then affix the disks to the center of the plywood pieces using a bit of wood glue and some finish nails. 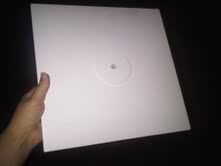
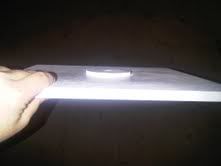
For the piece you intend to use as your top, you will affix a disk to only the bottom of the piece. For all other pieces there will be one on the top and one on the bottom. 
(this was my top piece, I chose to use the 12" piece as the top of my stand)
Then mark the exact center of each board and drill through with a 3/8" drill bit.
Then use the trim board to finish your base and then paint all pieces white. Make sure to use PRIMER as the wood will suck up a ton of paint.
Once all of the pieces are dry, have fun stacking to determine your finished height and then measure to determine how long of a threaded rod you need. I bought several sizes so that for smaller parties I will only use a couple of levels and for larger parties I can use a taller stand.
Hopefully this is helpful. Sorry that I don't have more in process photos, but I didn't intend to make a tutorial.
All in all, I think this cost me about $75 in materials/tools/paint for two large cake stands.
Let me know if you have any questions.

Thanks guys!
The pipe sections are 5 1/2 inches tall (I wanted extra space in between the levels) so they are taller than most standard stands.
The two nuts go one under the base and one at the top. The top one is visible but I painted it white and you don't really see it when the cupcakes are on the stand. You could countersink around the hole in the top piece to try and hide it, but I didn't know how that would affect it structurally.
I just sent this url to my husband......he now has a project on his next off weekend ![]() thanks this is one of the best DIY stands I've seen, can't wait to try it!!
thanks this is one of the best DIY stands I've seen, can't wait to try it!!


Fantastic tuitorial! Thanks so much. Could anyone tell me how many cupcakes one of these displays can hold? Suddenly now I am responsible for displaying my wedding cupcakes! Wedding only 2 weeks away.

Thank you so much,this is exactly what I was looking for! Thank you for sharing!

wow, thank you so much!! this is a great tutorial!! ![]()
To have it flat on top there is a nut that you can hammer into the hole that the threaded rod will screw into. It's called a t-nut. It has teeth in it I guess. So you still drill 3/8 hole then hammer in a t-nut and thread your rod so it's flush. Khalstead has a kind of similar technique in building a cupcake stand with the threaded rod, I like this though with the PVC pipe! Great stand!


I love the stand!! I just have one question...What did you use for the bottom of the stand? It looks like a piece of casing ?????

LOVE it! This tutorial is awesome! Thank you so much for sharing!

The stand looks sturdy. The most important thing is I can increase the size and holding capacity following the basic construction. My friend was asking to give her some advice on how she can manage to place 100+ cupcakes on a single stand and I think this can be the solution for her problem. Thanks a lot.
The stand looks sturdy. The most important thing is I can increase the size and holding capacity following the basic construction. My friend was asking to give her some advice on how she can manage to place 100+ cupcakes on a single stand and I think this can be the solution for her problem. Thanks a lot.
Quote by @%username% on %date%
%body%