

How Do I Make 3D Fondant/gumpaste People????
Decorating By Nina925 Updated 14 Nov 2013 , 11:51pm by caenana

Some people put spagetti or drinking straws inside of figurine for it to sit up like that.
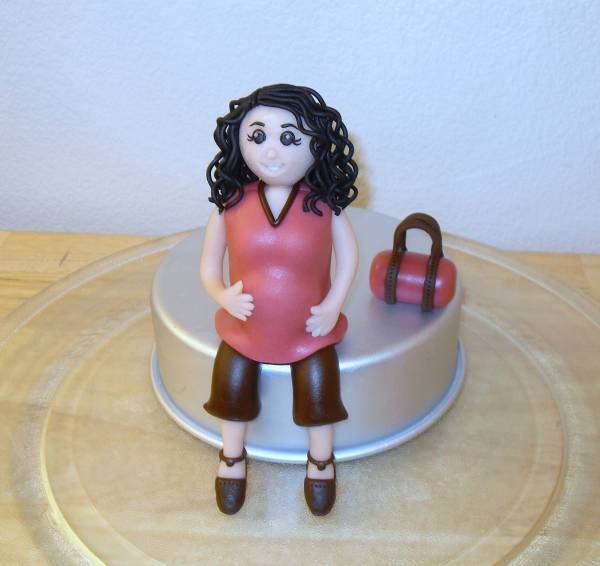
I got the PME people moulds yesterday and was really pleased with how my first attempt came out. I used fondant with tylose mixed in supported by toothpicks. The instructions are really good and explain how to make sitting figure etc.

When I made one, Lorraine McKay's tutorials http://www.extraicing.co.uk/#/sugarcraft-tutorials/4530759830 were very helpful, but since she doesn't sell a pregnant woman how-to, it took daaays to figure out a formula that worked for me...I didn't want to just start with a blob and try to sculpt it...
So, I began with 1/4 cup filled with flesh colored fondant (mixed w/ tylose)...from that, I removed a Tablespoon for the head, 1/4 tsp. for each boob, and 1 tsp. for the stomach, (for the boobs and bump, I filled the spoons and pressed them against parchment paper on a table...the flat back, and the rounded fronts were perfect to glue to the body once I popped them out...I didn't have to shape them at all, the spoons did all the work).
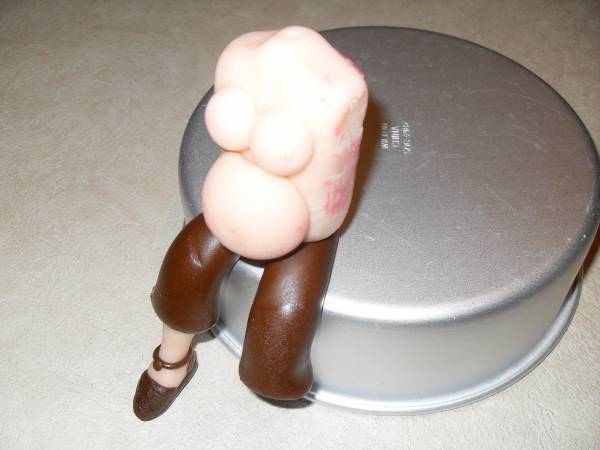
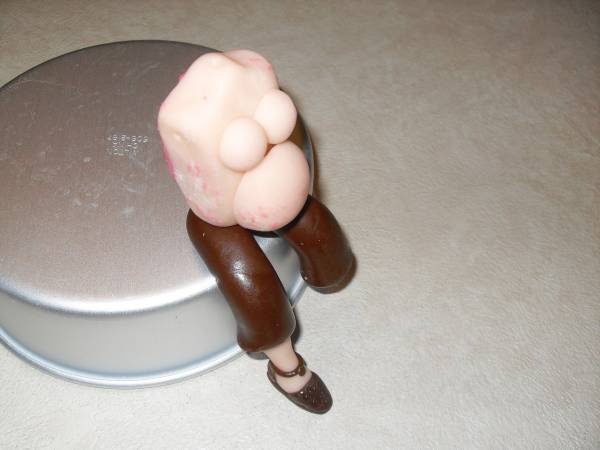
What was left of the 1/4 cup, I shaped into a torso. It was kind of flat, which worked great for the back, because it looked how it should when a person is sitting, you can see it better in the photo where the body is dressed and in the background.
Each (capri) pant leg was 1-1/2 tsp. of brown fondant (mixed with tylose). Those ARE the tops of the legs, I didn't cover legs with the brown.
The shirt had a front and back piece...they were joined at the shoulders and down the sides of the torso...next time I want to make a shirt that has a seam under the boobs, so the stomach stands out more.
I didn't measure the amounts for the arms & legs..I just started with a small ball for each, shaped, and trimmed as needed.
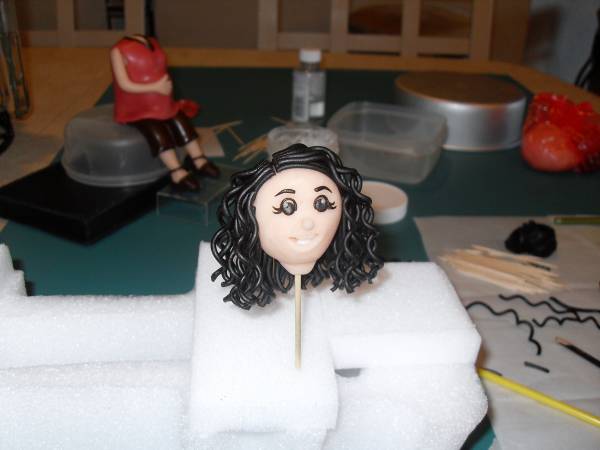
I used an extruder for the curly hair.
Her eyebrows and lashes are fondant...most people, even Lorraine, paint those on...but there was no way I was attempting that with a tiny brush!
Oh yeah, she doesn't have toes or ears ![]() !
!
By the way, this was just for fun, so she was already in the trash when I thought to take some undressed photos, to help me next time...that's why her pants & shoe are sweating and messy, part of one leg is missing, and you can see the color of her shirt still stuck to her torso.
One last thing...if you click on all the red X's below (after the photos), you can see each one a little bit bigger.


nina,, I use toothpicks
http://cakecentral.com/modules.php?name=gallery&file=displayimage&pid=1637944&done=1
I was running late and since it was for my own shower so I skipped the shoes..![]()
FlourPots awesome tutorial : ) thanks,

FlourPots I think your figure is lovely. What a good idea of using the spoons to get those lovely round shapes.
Thank you LateBloomer...and here you go, AfordRN....
I discovered that my MMF was going to need tylose if I wanted the hair to be curly...when I made 20 test curls without it...every single one broke...some while removing from the toothpicks, some while just handling.
The problem though...MMF w/ tylose does not do well when used with an extruder...it looks terrible, no matter how pliable it is going in.
After some experimenting, I decided to extrude the (tylosed) strands a little larger than I wanted, then use my fondant smoother to roll them down to size (on parchment). That process made each one shiny and smooth...then I wrapped them on toothpicks to take shape and dry.
(This seems like alot of work, but it wasn't that bad really...they were already in the snake shape...it would've been much worse rolling each curl from the starting point of a small ball, let's say).
I placed curls on the back of the head, then the sides.
Oh, on the sides, I put down a layer of "hair" flat to the scalp first (it might have been 5 or 6 strands - close together, on each side of the part), then I put curls on top...I didn't want any flesh color showing through (you can pretty much see this if you click on the red X, of the 4th photo above).
By the way, that photo shows the almost completed head...but I had to trim the neck, and at the last minute I thought she needed one final wavy curl on each side of the part, and one strand right on the part, LOL!... I had left that opening too wide.
Oh also...don't forget to make a hole in the neck of your torso (for the head) when you're finished forming it. If you do forget (like me)...use another toothpick, not the one connected to your head, and basically screw it down in...each turn will make the hole deeper, and it won't distort any of the work you've done, like jamming it down might.


what is an extruder? Nice work btw and thanks for the hair info.
This is the one I use: http://www.makinsclay.com/US/eng/products/ultimate.htm
Thanks so much! I will have to get one of these.
I agree with aej6. Now I know why your hair looks so natural. You went to such trouble. Thanks for sharing.

Thanks for the tip  could you give an idea how much tylose you use in relation to the fondant?
You're welcome...always happy to share ![]()
I don't use a measured amount of tylose...for me, it really depends on how it feels in my hand....that's how I know if it needs more or not.
When it's a small piece of fondant, I push it right into the jar a few times and whatever sticks to it, is the amount.
When it's a larger piece, I sprinkle it in.
(Darker colors require more than lighter shades, in my experience)
Thanks so much
I have more specific details regarding the hair, if anyone is interested...
(I didn't want to overwhelm the OP - who's new)
Thanks for explaining about the hair! - one thing I don't understand- if you curl them on toothpicks as shown how do you add to the head once dry and create a bit of 'straightness' to the roots? what I mean is, you are curling the full length of extruded fondant but in the picture of the head the top part near her roots is straight - if the curls have set and you try to straighten a bit don't they break (i say this only becuase that is what happened to me when i tried somethign similar)... if they don't set enough the curls just droop and straighten... what am i missing?
And how do you roll the extruded strands? I find I can't keep them uniform and are difficult to handle since they are so thin to begin with?
Thanks for explaining all of this in so much detail and taking pictures!!!
Even though the curls had tylose, they didn't set rock hard...when they came off the toothpicks, they were very strong, but almost springy...I was able to stretch the ones that I felt were too corkscrew-curl and not wave-curl LOL...I did this for alot of the back hair. I didn't think it would look good to have the back pouf-ing out like the sides, so I wanted less curl there.
If you look on the right side of photo 4 you can clearly see a few that have been stretched...their curl was much tighter off the toothpick, and it's not that they wilted, they were stretched. Don't get me wrong, I didn't man-handle them...I just needed to elongate some, and I was able to do so easily.
For the root area, I did stretch that end a little, but what really kept it flat was just wetting the underside, placing it, then holding it down for a bit.
I should add...the strands were not on toothpicks drying for days...I prepared them in the morning and by that evening I tested one or two, liked how they looked and handled, and went to work.
As for rolling...in my experience, the trick to doing it with a smoother is to never let the piece get too long for what it's going to be used on...the longer it is, the harder it is to control. It's much easier to roll three 4" pieces than one 12" piece.
So, once you get near the size you need, cut the rest off...then concentrate on uniformity.
When doing hair, if the cut off piece is a useable size, roll that one too, trying to match the width of the one you just did.

I thought you guys on this thread would really dig this as much as I do, here's a link to the cutest figure I've ever seen: http://www.flickr.com/photos/craftyconfections/4529046122/

FlourPots, I've had that little lady of yours saved since I first saw it, knowing I would try to duplicate it some day. I am so excited to see your details. Thank you so much for all the detailed info!!!!!!
Quote by @%username% on %date%
%body%