


Hi...
I like most of you here, used to dread using tappit, they would get stuck, distored, or had jagged edges among many other things...
But... after many tries... I found a fail-proof way... with this method... you will see that it is not only easy... but fun to do...
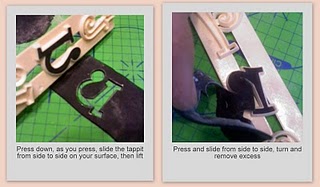
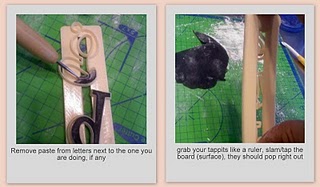
Points to keep in mind:
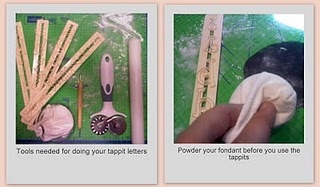
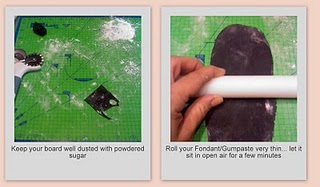
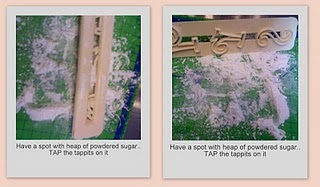
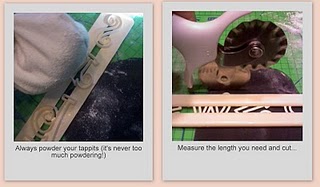
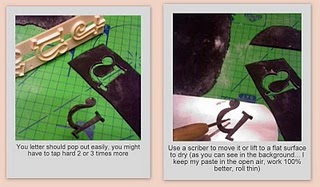
1) Keep your surface heavily powdered.
2) Roll your gumpaste/fondant very thin
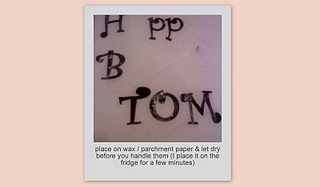
3) Keep out on open air for 2-5 minutes, let it dry a bit
4) Dust your tappits before each use
5) Move you paste at times to make sure it's not sticking
Hope this is helpful to you...

Hi! Thanks so much for posting this! I've seen frequent posts about them, and have been considering investing in them. Now I'll know exactly what to do when I get them! ![]()
Thanks so much - some of us need pictures because we have trouble visualizing from a description!


Lovely tutorial!!!!I also do it this way but use crisco on my board and tappits when cutting out dark coloured gumpaste as powdered sugar tends to dull dark colours.
Tee-Y...
Crisco? can u epxlain to me a little more?I would love to try that way also... I do brush them and they are fine, but I wonder how it would be with crisco.... doesn't it take longer to dry when covered in it?

ive had my tappits over a year now, and on my last cake one of my tappits snapped into pieces, Devistated, i love them so i need to buy more haha! i love your funky tappits! might have to get some of those too!

Lovely tutorial!!!!I also do it this way but use crisco on my board and tappits when cutting out dark coloured gumpaste as powdered sugar tends to dull dark colours.
Tee-Y...
Crisco? can u epxlain to me a little more?I would love to try that way also... I do brush them and they are fine, but I wonder how it would be with crisco.... doesn't it take longer to dry when covered in it?
Not at all, I rub my surface very lightly with the crisco, roll my gumpaste over it thinly, lightly brush my tappit with the crisco and cut out and the cutouts fall out of the tappits so easily you'll just love using it.It dries just as fast as using PS without the mess.


Here is a great youtube on tappits. http://www.youtube.com/watch?v=cyS7msb13jE&feature=channel Thank you to whoever origonally posted this.


Awesome thanks! Mine are on their way, should get here this week!!!

Excellent tutorial, I love tappits and I wish this had been around when I started with them. Just to throw in my twopence worth, I find cornflour works better than icing sugar and once they are on the board or cake, I lightly brush with vodka to remove excess and bring the colours up nice and bright.


I love my tappits too. I have all the letters/numbers and the one with the scroll" type edging patterns. I use fondant with some gum-tex powder worked into it. As this tutorial says, roll it very thin and let it sit for a few minutes before even going for the tappits. I use powdered sugar to roll mine out also. I find dark colours OK when I use a dry paint brush to dust away any powdered sugar, and a super light brush with shortening (or vodka as mentioned) solves the problem.

YAY I tried this technique last night and it worked ON THE FIRST TRY for each letter! I think the key for me was to let the fondant sit for a few minutes after rolling it out very thin. Thanks for the tutorial!
AWESOME!!!
So glad my tutorial was able to make your tappits adventure easier! I have learned so much from everyone here.... love this site!!

Hi! Thanks so much for posting this! I've seen frequent posts about them, and have been considering investing in them. Now I'll know exactly what to do when I get them!
Malibubarbie you said is right. thanks for posting I'm always looking for new techniques to try.
Awesome info![]() )
)
Now can someone clue me in one why I need 5 hands to use my BEADMAKER!
I have mushed a million ropes and am fed up..LOL

I have a question for anyone who uses the funky tappits -- I have them, and love them and have had no trouble with them EXCEPT for the capital D -- I cannot get the inside of that letter to cut for beans! ![]()
![]() Does anyone else have this problem? (Notice it's the ONLY letter I have this issue with...)
Does anyone else have this problem? (Notice it's the ONLY letter I have this issue with...) ![]()
Quote by @%username% on %date%
%body%