


sorry to be stupid here...
So I need to buy the machine to cut (cricut) and the SCAL is a software that can be used on the machine so I don't have to buy all the cartridges and download (upload) my own images plus a lot more??? Right??
I am really sorry if this is a stupid question.... I am so computer challenged.

All that buying of extra 'stuff' to be able to use all the stuff you already own? That is why I chose the the Silhouette SD over any of the Cricuts..... no extra software to have to buy to use what I already have! Anybody else using/considering the Silhouette?

All that buying of extra 'stuff' to be able to use all the stuff you already own? That is why I chose the the Silhouette SD over any of the Cricuts..... no extra software to have to buy to use what I already have! Anybody else using/considering the Silhouette?
Please tell us a little more about the Silhouette...where can we buy it? price range?? ok, thank you !!!

@ Rosie2 I have the personal and so far it's been great for what I have envisioned. But saying that I can already see that eventually the expression is the one I'd want, but for now this is good for my needs.
@mcdonald, yes you need the cricut machine, but instead of buying cartridges at $80+ a pop for $70 (approx) you can buy the software Sure Cuts A Lot (SCAL) and hook up your cricut via a USB cable to the PC to make your own files to cut.

All that buying of extra 'stuff' to be able to use all the stuff you already own? That is why I chose the the Silhouette SD over any of the Cricuts..... no extra software to have to buy to use what I already have! Anybody else using/considering the Silhouette?
.
Please clarify what you mean by "all that buying of extra 'stuff" to be able to use all the stuff you already own"; I'm also interested in the Sihouette SD; please enlighten us. Thanks.
Bev

Thank you for putting updates girls, I am practically 'flying'
Dutchy, can you please tell me which Cricut do you have?? I am buying the small one that says Cricut Personal Cutter. I really hope I can cut small letters since I like to make cookies and I want to be able to put messages on them...I hope!
If you figure out how to cut really tiny letters (like 1/2") without the inside tearing all to pieces, please let me know. Another CCer that does cookies was trying to do the same thing for her cookies and we both tried and tried and nothing worked. So please let us know if you get it to work!
Certainly! if I figure out how to cut small letters I will certainly let you know...although, I'm having my doubts about buying the Cricut now since I read the message about The Silhoutte....![]()
![]()
![]()
I am considering the Silhouette also. Just trying to read everything I can about both machines and then will make a choice. Please tell me what you feel the advantages of the Silhouette are (other than no cartridges to buy). Have you used it for gumpaste?
I've had my Silhouette SD for a while now, and have had fun learning how to use these digital cutters! I had never even seen one used [ like for scrapbooking that I do not do ] before learning about the possibility of using one for cake decorating right here on CC. I started looking at the various options, and for me not having to buy cartridges or special programs to use what I already had was the only way to go. I have use programs like Paint Shop Pro and several other graphic design programs for YEARS and can 'cut&paste' and 'photoshop' all kinds of graphics to make them something I can use both on paper and for my cake designs using my airbrush. [ I often print out graphics and use the overhead projector or cut a stencil for the airbrush design ] I've been 'collecting' graphics and fonts for years as well so I do have a lot to choose. So the thought of having to get cartridges with graphics or fonts just didn't interest me, and having to purchase another program to do what I can already do.....well you get the idea. That is when I decided on the Silhouette where I can import jpg's, use my own fonts...what ever!
I DL the program from the Silouette site that comes with the machine even before I got one, so I could actually try it out with my 'stuff' and be sure that what I thought would work really would....and it did. So when the machine finally got to my door, I was ready to plug it in and go! I was able to cut my first gumpaste design the day my machine arrived, and after a few practice/learning tries, I had excellent results. The biggest 'challange' was getting the settings just right, as no one had posted them for the Silhouette just the Cricut.
Pricing: I have no place where I can go and buy ANYTHING here in the boonies, so Ebay was my to go place to shop. I watched the listings for several days for both the Cricuts and the Silhouettes as well as the recommended add on program everyone was considering just to get a sense of how the bidding was going. Then I set my personal price point that I was willing to spend and started to bid. Amazingly I saw people get caught up in the bidding and actually bid MORE on some machines than other vendors were offering as a Buy it now option! Unbelievable! So it took me a week or more to buy at my price which I set considering the retail price of the Silhouette vs the Cricut, the taxes if purchased locally, the shipping if any, additional programs that would/could be purchased etc. My final price came in at $145 which was less than 1/2 the retail, and included a $25 design download card form the Silhouette site. So that is still less than the $99 special for Cricut at Michael's and the recommended program! Not to mention cartridges if needed.
So that is my Silhouette story...and I'm sticking to it! heheheh Yes, I am happy with my purchase, delighted that I can use so many of the graphics on my computer and the ease of use of the program ROBO Master that comes with the machine. This is the program that I DL BEFORE my final decision on which machine to buy and can be found @http://www.silhouettemachine.com/software.aspx if any of you would like to test it out before making any decisions.
Any regrets? YES...I need more cakes to make to use all the design ideas in my head!
Obviously I can't use it on everything so will be collecting ideas and waiting for the best opportunity to use them to present itself!
Thanks so much bisbqueenb for your input on the Silhouette; can you share how you got the settings just right, or is that a variable? Also, I contacted Linda McClure at www.deseretdesigns.com inquiring as to whether the Silhouette could be used along with her DVD and she didn't know for sure as she only uses the Cricut. Do you have Linda McClure's DVD, are the instructions compatable with the Silhouette and is the DVD worth it? Sorry about all the questions, but "inquiring minds what to know" before making the investment. Thanks again.
Bev

I do not have or currently plan to get Linda's DVD. I did some 'test' cuts with the Silhouette to get the best settings, slow and light cut... and fairly thin gumpaste/fondant. I started with a small piece of paste on the carrier [ I actually used acetate sheets cut from a file folder from Walmart rather than the 'expensive' carrier that cake with the machine] used a light smear of Crisco to hold it and used a small design to run thru to see how it cut and adjusted each time as I saw results. I did let the rolled out paste sit and dry for 5-20 min. before cutting and found the softer the paste the longer the wait! Then when I got a good setting I created a Gumpaste setting in the program so it remembers for me!
PTanyer I tried today to get some small lettering, I tried my design on paper 1st it was great, but the gumpaste didn't hold up so good. Some letters were ok others were all bunched up. I'm not sure if they would have worked if my gumpaste had been a little thicker. I ended up using my small cutters for the lettering on my cake.
I did however get the shamrock cut out on my cricut
http://www.cakecentral.com/modules.php?name=gallery&file=displayimage&pid=1431799&sub=1432033&done=1
The shamrock is a really nice clean cut! Word to the wise: thicker is worse when it comes to fine details like small letters, etc. You have to get it really thin to cut smaller letters to work. But really small - like 1/2" just aren't working for me. Like you, I tested on paper first and it works great. But not with gumpaste. Maybe eventually we will figure out how to do it. Right now all trial and error (with a little frustration thrown in for good measure...lol).
ah ok mine was wafer thin today and about 1/2" in height. Defiantly all trial and error, but getting there ![]()
Thanks I'm really happy the way the Shamrock turned out. I had some good success with fonts the other day, got some great cuts, but they were all bigger.
We'll get there one day and all become masters at this ![]()
ok ladies, I finally did it!! Can I just tell you how overjoyed I was when this cake was all done. I felt like it was my child and I did not want to let it go after all the trial and error it took to make it with the cricut but it is done and the woman went CRAZY over it! It matched the baptism invitation perfectly!!
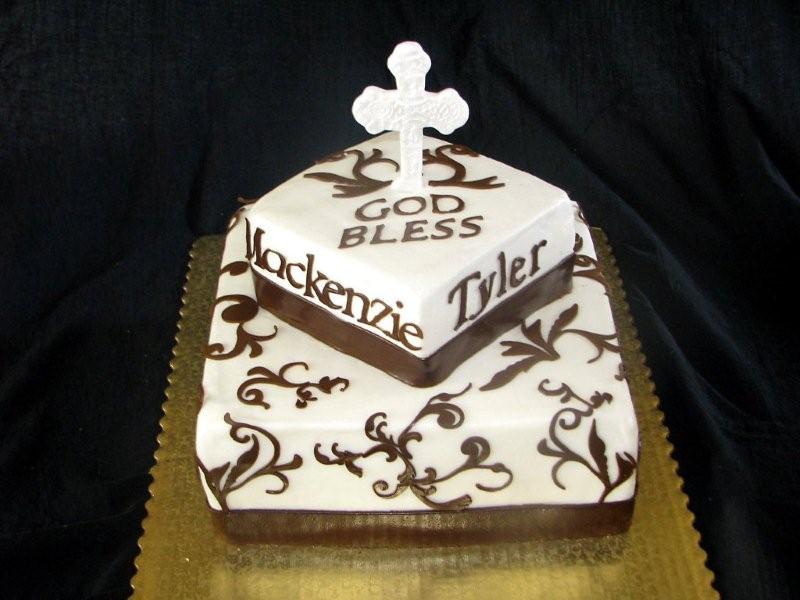

Now I know why fondant, and gumpaste reminded me of scrapbooking.
Oh My that is just beautiful. Great job cjshoemake. It really is worth all the frustration to get those results

cjshoemake,
Your cake looks great. ![]()
Imagine trying to pipe that design or cut it from gumpaste.
Thanks for the compliments ladies! As we all know it took lots of trial and error but it is definately worth it once it is figured out.
I actually had one issue after the next. If it wasn't the actual cricut machine eating my fondant it was the SCAL program closing itself down(apparently it happens a lot with Windows Vista and I hear they have a download to help that) or it was Inkscape not recognizing my pictures. I was going to say forget it, I dont have time and hand cut but I was determined(my husband likes to call it stubborn ![]() ) so I scanned my picture, opened it in inkscape(I posted the tutorial link a few posts earlier, follow the directions exactly and dont forget to hit UPDATE!) Then open it in SCAL. I had my fondant already rolled out on the mat for about 25 minutes. I had a little bit of gumpaste mixed in, not a lot b/c I knew this would be a long process and from trial and error before it would dry out too much from cutting and then rerolling that it would start to crumble. I waited until it was no longer tacky at all. It has to be very thin. Not to where you can see through it but almost. I let my husband roll one time and his was a tad thicker and it did not come out right, All the little scrolly details bunched up. So the thinner the better works! Once cut, I let them sit for another 5 minutes.(I usually set up on my computer the next round to be cut while I was waiting) After the 5 minutes, I took my Xacto knife and simply lifted them on to a matted cookie sheet and fixed any curls the way they were supposed to lay. I left those a lone until I was all done with all my cutouts. I even cut out all the letters the same way too. It did take me a while to figure out how the SCAL and cricut mat correlated. If I was using a smaller piece of fondant , I had to move my image on the computer screen to the right place so it would hit the fondant and not the mat. I also downloaded some flourishes from a site that were beautiful and I was going to use them as extra fluff but I could not use them. It showed up as a whole page of them but then when I hit cut, they would cut like 8 inches apart from each other(and off the mat) yet on the computer screen they were right next to each other. This was yet another cause for frustration. I gave up on that as it was wasting time I was running out of!
) so I scanned my picture, opened it in inkscape(I posted the tutorial link a few posts earlier, follow the directions exactly and dont forget to hit UPDATE!) Then open it in SCAL. I had my fondant already rolled out on the mat for about 25 minutes. I had a little bit of gumpaste mixed in, not a lot b/c I knew this would be a long process and from trial and error before it would dry out too much from cutting and then rerolling that it would start to crumble. I waited until it was no longer tacky at all. It has to be very thin. Not to where you can see through it but almost. I let my husband roll one time and his was a tad thicker and it did not come out right, All the little scrolly details bunched up. So the thinner the better works! Once cut, I let them sit for another 5 minutes.(I usually set up on my computer the next round to be cut while I was waiting) After the 5 minutes, I took my Xacto knife and simply lifted them on to a matted cookie sheet and fixed any curls the way they were supposed to lay. I left those a lone until I was all done with all my cutouts. I even cut out all the letters the same way too. It did take me a while to figure out how the SCAL and cricut mat correlated. If I was using a smaller piece of fondant , I had to move my image on the computer screen to the right place so it would hit the fondant and not the mat. I also downloaded some flourishes from a site that were beautiful and I was going to use them as extra fluff but I could not use them. It showed up as a whole page of them but then when I hit cut, they would cut like 8 inches apart from each other(and off the mat) yet on the computer screen they were right next to each other. This was yet another cause for frustration. I gave up on that as it was wasting time I was running out of!
Once it was all cut, I had fun just laying them on the cake where I wanted. They were not hard(crusty) at all, they were firm enough to pick up without distorting the images. So my only tip is to make sure your fondant is thin and has set out for some time before inserting. (older fondant works great and does not need any gumpaste in it.) so if you have colored fondant from another project, you can reuse that for some fondant accents on another. Also do not put your fondant too close to the right side as it gets caught up in the roller and is very hard to get out on that side. This was another source of frustration. On the scal, it was cutting on the right side as to where on the cricut you cut on the left and can manually move it around to where you want it to cut.
well these are my steps in a round about way ![]() If you have any questions feel free to ask. I do not have the Linda DVD and was going to get it until I had success with this cake so I am not sure now if I am still going to get it. What else is in there besides teaching you how to start it. ( I figured that part out
If you have any questions feel free to ask. I do not have the Linda DVD and was going to get it until I had success with this cake so I am not sure now if I am still going to get it. What else is in there besides teaching you how to start it. ( I figured that part out ![]() )
)
I am excited to try another cake and use it soon.
It is not hard after you figure it out, actually my 4 & 5 year old now know how to load and unload the mat with fondant on it and to cut images from the cricut off of it!! TOO FUNNY!!! by the way, the cricut comes with a Plantin Schoolbook cart, and the award certificate is PERFECT for a baby blanket!!! my 5 year old son showed me that. ![]()

I've had my Silhouette SD for a while now, and have had fun learning how to use these digital cutters! I had never even seen one used [ like for scrapbooking that I do not do ] before learning about the possibility of using one for cake decorating right here on CC. I started looking at the various options, and for me not having to buy cartridges or special programs to use what I already had was the only way to go. I have use programs like Paint Shop Pro and several other graphic design programs for YEARS and can 'cut&paste' and 'photoshop' all kinds of graphics to make them something I can use both on paper and for my cake designs using my airbrush. [ I often print out graphics and use the overhead projector or cut a stencil for the airbrush design ] I've been 'collecting' graphics and fonts for years as well so I do have a lot to choose. So the thought of having to get cartridges with graphics or fonts just didn't interest me, and having to purchase another program to do what I can already do.....well you get the idea. That is when I decided on the Silhouette where I can import jpg's, use my own fonts...what ever!
I DL the program from the Silouette site that comes with the machine even before I got one, so I could actually try it out with my 'stuff' and be sure that what I thought would work really would....and it did. So when the machine finally got to my door, I was ready to plug it in and go! I was able to cut my first gumpaste design the day my machine arrived, and after a few practice/learning tries, I had excellent results. The biggest 'challange' was getting the settings just right, as no one had posted them for the Silhouette just the Cricut.
Pricing: I have no place where I can go and buy ANYTHING here in the boonies, so Ebay was my to go place to shop. I watched the listings for several days for both the Cricuts and the Silhouettes as well as the recommended add on program everyone was considering just to get a sense of how the bidding was going. Then I set my personal price point that I was willing to spend and started to bid. Amazingly I saw people get caught up in the bidding and actually bid MORE on some machines than other vendors were offering as a Buy it now option! Unbelievable! So it took me a week or more to buy at my price which I set considering the retail price of the Silhouette vs the Cricut, the taxes if purchased locally, the shipping if any, additional programs that would/could be purchased etc. My final price came in at $145 which was less than 1/2 the retail, and included a $25 design download card form the Silhouette site. So that is still less than the $99 special for Cricut at Michael's and the recommended program! Not to mention cartridges if needed.
So that is my Silhouette story...and I'm sticking to it! heheheh Yes, I am happy with my purchase, delighted that I can use so many of the graphics on my computer and the ease of use of the program ROBO Master that comes with the machine. This is the program that I DL BEFORE my final decision on which machine to buy and can be found @http://www.silhouettemachine.com/software.aspx if any of you would like to test it out before making any decisions.
Any regrets? YES...I need more cakes to make to use all the design ideas in my head!
Obviously I can't use it on everything so will be collecting ideas and waiting for the best opportunity to use them to present itself!
I too, have lots of graphics in my PSP (I have 7,8 and 11). I took a look at the Silhouette and it looks like a terrific machine, but I have one question. You create your image, and from what I understand..you need to print it out on a printer...then put that printed page in the Silhouette to cut....are you using frosting sheets to print out your image, then placing frosting sheet on the gumpaste to be cut in machine?
I ordered Cricut Expression from HSN, been wanting one for quite awhile, not sure if I will find the opportunity to use it for cakes, but this sure looks like a fun project to attempt. I have been looking at
svg cuts videos till I'm crossed eyed, not to mention Cuttlebug videos. I want to be able to emboss as well...good deal at HL with a 40% off coupon for cuttlebug. Great job on what ya'll have done with this cricut cutting, I just hope I can do it with paper lol.
Helen asked: "You create your image, and from what I understand..you need to print it out on a printer...then put that printed page in the Silhouette to cut....are you using frosting sheets to print out your image, then placing frosting sheet on the gumpaste to be cut in machine? "
Sorry for any confusion....That sounds like the Print/Cut you use for PAPER projects....for sugar you just design your 'project' in what ever program you are using, import to the cutting machine software[ I'm using the Silhouette and the program is Robo but probably the same same principal for all of them ] and cut the gumpaste or fondant out instead of paper! I would imagine if you used the edible image printers and printed out the sheets you could then use that Print/cut feature to cut it out. I don't know if the Cricut has that option but I do know the Silhouette does, but since I do not make the edible images I can only speculate!
Thanks for explaining my question, when I looked at one of the sites for the Silhouette, it only showed the print and cut tutorial. I really liked how that machine cuts out the color graphic...I ordered cricut before knowing about this one...if I really get into scrapping, I just may have to get this too....big problem with me, buying toooooo many toys. Thanks again for the answer, back to canning tomatoes.
PTanyer I tried today to get some small lettering, I tried my design on paper 1st it was great, but the gumpaste didn't hold up so good. Some letters were ok others were all bunched up. I'm not sure if they would have worked if my gumpaste had been a little thicker. I ended up using my small cutters for the lettering on my cake.
I did however get the shamrock cut out on my cricut
http://www.cakecentral.com/modules.php?name=gallery&file=displayimage&pid=1431799&sub=1432033&done=1
If you have the small Cricut, that comes with the cartridge George, you can use sign post, it is on the left side of the overlay to cut very small letters, as the letters are inside a sign post. I think the letters were no larger than a half inch.
Thanks Katie will check that out.
I'm preparing for a cake this weekend which, with fingers crossed, will be all cricut cutouts. I've downloaded various city skylines and famous world landmarks all as silhouettes. Hopefully the idea I have in my head will be created on the cake ![]()
Ok if you all promise not to look at the messy fondant job ( stupid weather, warm house and who knows what else, but it didn't turn out well at all, even as I made it I knew it was going to be bad and this was batch #2) anyway, I finished a cake for my friends birthday party, she's having around the world theme.
I did all the cutouts on the cricut, most of them one cut success some we had to battle with.
http://cakecentral.com/modules.php?name=gallery&file=displayimage&pid=1437470
You cut the actual gumpaste with the cricut?
How did you do that?
Quote by @%username% on %date%
%body%