


Tutorial- Heart Cake Balls On A Stick
Decorating By Rocketgirl899 Updated 19 Feb 2009 , 5:00am by Rocketgirl899

Hello,
So this is my first time making cake balls and I wanted to do a test run for my bf for valentines day! The final product will be the colors of conversation hearts ![]() piped with lil love messages for my hunny
piped with lil love messages for my hunny ![]() ya, I know sappy. <3 thats what love does to you!
ya, I know sappy. <3 thats what love does to you!
What you need:
Cake Ball recipe ( I use bakerella's red velvet YUM!) bakerella .com
lolly pop sticks- mine are 6 inches
polyethylene candy bags- i used 3x5inch
twisty ties
ice cream scoop
off set spatula
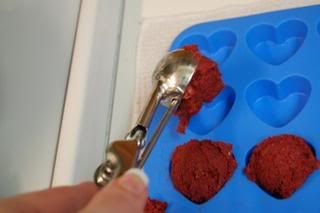
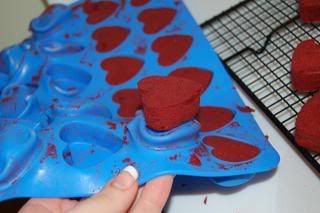
wilton silicone heart mold- the small one with 24
candy melts
powder candy food color*
Styrofoam block
makes 48 hearts plus 2 balls to eat I mean taste test..
* i used powder and there are tiny little specks of color that didn't dissolve, I am working on fixing that.
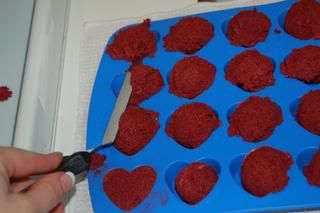
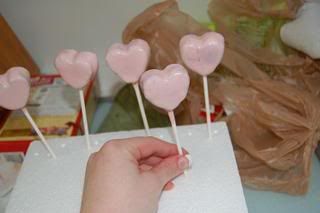
First make a batch of cake balls. Use the ice cream scoop and plop balls in each cavity. use the spatula to press mixture in and then level off.
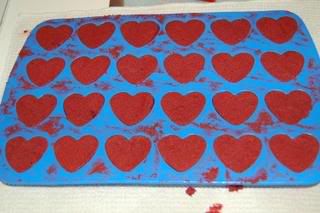
put in freezer for 30-45 minutes. don't worry they don't get that hard.
Unmold! Tricky at first but i finally got it. flatten and mold to adjust any mess ups
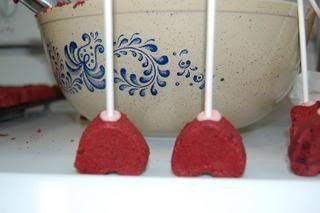
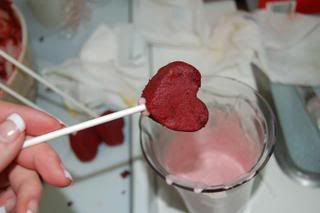
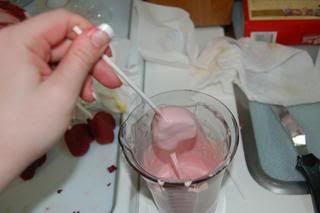
dip end of lolly stick in melted and tinted candy melts let sit to harden.
Dip cake ball lolly and shake of excess
put in Styrofoam to harden.
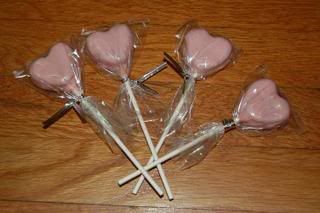
*this is where I would pipe with royal icing a little message or you could use candy melts too.
once dry wrap with little baggy and twist with twist tie!
ohh and try not to eat the prettiest ones ![]()
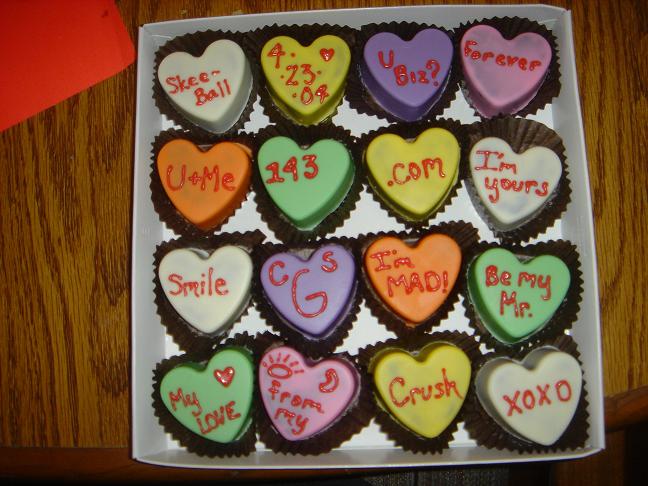
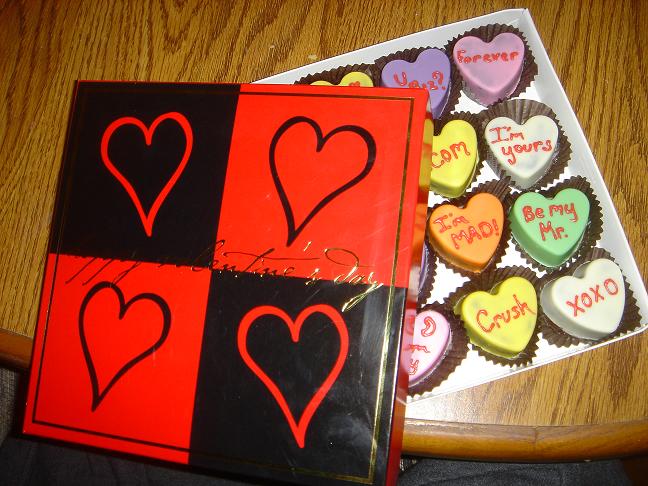
Hope this inspires you to make all kind of shapes! I will post the conversation hearts when I get them done. Which actually might be after V day! They wont be on sticks, I am going to make them look kinda like truffles in a box because I have to ship them (3000 miles!) away!
colors for conversation hearts:
white
lavender
pink
yellow
green
orange
Red writing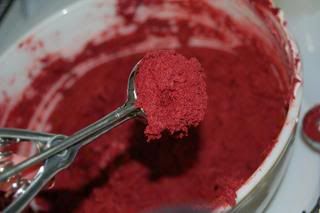


I love these! So cool and creative. Thanks for sharing!
By the way.. your nails are so pretty! LOL My hands and nails look like rainbow colors and dish pan hands! ![]()


I don't have a BF (well, I do but we've been married for 30 years!) but I bet my grandchildren will love them. Thanks for the idea ![]()

My bf and my hunny are the same person...
hehe. and he would tickle me till i peed my pants if he knew i called him my hunny... lol.
I love these! So cool and creative. Thanks for sharing!
By the way.. your nails are so pretty! LOL My hands and nails look like rainbow colors and dish pan hands!
this is not what my nails look like during a usual baking session! my finger tips were kinda red from the red velvet. But thanks for noticing! They are actually my real nails and I paint them myself! It costs about 15cents to do it myself vs. $25 at a salon! I have no money, and this way I can do my nails once a week. You would be surprised how much better and healthier they are when you do it weekly. Also it doesn't take any longer (about 10-15 minutes to paint) then driving to the salon, waiting getting them done, getting them done letting them dry and driving home. ![]()
more info than you would like to know I bet ![]() maybe I will do a tutorial on french tip nails!
maybe I will do a tutorial on french tip nails!


more info than you would like to know I bet Very Happy maybe I will do a tutorial on french tip nails!
![]() All your tutorials are very helpful! I was going to make cupcakes for my kids classes but these would be so fun!
All your tutorials are very helpful! I was going to make cupcakes for my kids classes but these would be so fun!


Thanks for sharing Rocket!! I can't wait to try them! ![]()
Okay now I have a question: When you take the lolly stick and dip it into the chocolate, do you put that into the bottom of the heart immediately or do you let the chocolate set up on the stick then put it into the heart?
I am glad you guys all enjoy it! i figure if I am going to go through the trials and hassels of trying something new, I should snap a few photos and share!
if you don't wanna put them on lollies just dip them like petit fours. then put them in one of those truffle cups (make sure it will fit!).
Also these are kinda a pain to unmold at first, but you will get it. I thought about spraying them with pam but figues it would mess with the candy melts or not even work. I also tried putting plastic wrap in one cavity, but too much of a pain!
good luck and post pics when you try them!
nah i just put alil on the end of the lolly and shove it in as far as i can with out poking through the other end!
you don't need a lot of chocolate on the lolly, it will make the stick kind of messy. Try it, you will understand. Sometimes I don't do too well with out photos ![]() lol.
lol.
Thanks Rocket!! I have a ton of those silicone thingys and I've been trying to come up with something cool to do with them! ![]()
I am so glad I saw this. I purchased the silicone heart pan and baked red velvet cakes in them and HATED it. I thought I had wasted my money on it and now I have a GREAT new idea to try.
Thanks so much for a great lesson!!!
Hazel
does this mean shouldnt try to actually bake in them? lol. oh well. plus I can't wait to make ice cubes outta the molds!
also, wilton has some bigger ones (more like cupcake size) that might be pretty for romantic dessert. I mean these lil hearts, your gonna eat 4-5 of them anyway!
OHHHH I am "officially" a forum addict now! Yes!
bobwonderbuns
no problem! if you try other shapes let us know how they work out. I might buy others too.
you can also do this with a cookie cutter, but its a PITA... especially if you have really tall cutters.

this is not what my nails look like during a usual baking session! my finger tips were kinda red from the red velvet. But thanks for noticing! They are actually my real nails and I paint them myself! It costs about 15cents to do it myself vs. $25 at a salon! I have no money, and this way I can do my nails once a week. You would be surprised how much better and healthier they are when you do it weekly. Also it doesn't take any longer (about 10-15 minutes to paint) then driving to the salon, waiting getting them done, getting them done letting them dry and driving home. ![]()
more info than you would like to know I bet ![]() maybe I will do a tutorial on french tip nails![/quote]
maybe I will do a tutorial on french tip nails![/quote]
Ha ha as I was reading that I was thinking... whares THAT tutorial...? I need it. I ha nail biter for 22 years and JUST broke that habbit with the birth of my new son because they looked so nice!
Ha ha as I was reading that I was thinking... whares THAT tutorial...? I need it. I ha nail biter for 22 years and JUST broke that habbit with the birth of my new son because they looked so nice!
I used to bite my nails... and sometimes just freak out and still do (then i get mad cause they look horrible.lol. if I get my HW done, I will do a tutorial tonight and post the link. I need to redo my nails anyway ![]() It cost about $15 to get all the supplies, but they last at least a year, and that's doing your nails 3-4 times a month!
It cost about $15 to get all the supplies, but they last at least a year, and that's doing your nails 3-4 times a month!

I looked at this and thought...so simple!!why hadn't I thought of that?? But I am the "think inside the square" kinda person.
Ice cube trays (of which I have heaps)...so simple! I gotta wonder where my brain is sometimes. Ok, off to raid the cupboard for other "moulds" I can use!
Awesome tutorial, thank you! I would love a tutorial on nails, haha. I can make heart cake pops for my family and then do my nails all from tutorials on CC! Sweet.
I looked at this and thought...so simple!!why hadn't I thought of that?? But I am the "think inside the square" kinda person.
Ice cube trays (of which I have heaps)...so simple! I gotta wonder where my brain is sometimes. Ok, off to raid the cupboard for other "moulds" I can use!
be careful! I dont know if i could get these things outta regular ice molds... the silicone lets them be flexible to be pushed out. good luck! let us know how it goes..
on a side note, i did my nails took photos and i can't them off my camera! ergh!!! might have to wait longer. so sorry!
Great pics of the pops. I loved having the directions AND photos.
I am also waiting for the nail info with pics. If you decide to not actually post here please pm me. I would appreciate it and so would my hands.
Thanks!

when I get up the photos I will link it here and I will tryto pm you jannie.
If i don't get it done this week I might make a you-tube video because you really need 3 hands to take photos and paint ![]()
I love directions and photos too.. I am such a visual learner
uhhh 3rd time for this post!
okay, here is the final product.
I eneded up painting the silicone molds and piping (so easy!) the cake balls. Then covered with a little candy melts. Piped on red messages.
Don't mind the random sayings ![]() just inside things between my bf and I. Also, i forgot to do all caps, and should have used a smaller tip than tip 1.
just inside things between my bf and I. Also, i forgot to do all caps, and should have used a smaller tip than tip 1.
Quote by @%username% on %date%
%body%