


OK. I saw the nautical style cakes posted lately and thought, that would be cool. My second eldest daughter (soon to be 9 y/o) wants an Ariel themed birthday party the end of next month. I have the Ariel doll and plan on doing her tail in fondant and putting her on top of the cake. I thought about doing an ocean beach theme, but decided maybe a cake with candy sea shells and royal icing coral would be a cool idea instead (and she thought it was great). Sooooooo, I go to Michaels today and get some molds and candy melts and powdered colorings to sprinkle on top for color.
What I learned:
Sprinkling or brushing the color on after making them does not really seem to add much color (if any) at all.
Sprinkling it into the mold seems to put to much color all in one place (I tried brushing it in with the third attempt, so we'll see how that comes out in a bit-they are in the fridge setting up).
It's best to melt candy melts in stages. They get really hot and can burn through the bag.
Candy melts that burn through the bag can give a 2nd degree burn.
A cold can of soda makes a really good fast ice pack when you are in severe pain and can't coordinate making an ice pack for your still burning 2nd degree burn......
Soooooo, now that I have the basics down (and hopefully nobody else will make these mistakes after reading this). I was curious. How do you color the candy's when you put them in the mold???? The one's I've seen look really impressive. Mine are less than ideal (I'll post a photo later after I download my camera so you can see them). I really want to pull this off for my kiddo, but not sure I can make these and make them look somewhat realistic? TIA for any suggestions.....

I don't know much about candy making, but I did make some rubber duckie candies to go on a cake this past weekend. The directions for color had me 'painting' the beak in orange first, then the eye in blue, (right on each of the candy molds), then I put the melted yellow candy in on top of that. I wasn't sure how to do it, so I dyed a little of the yellow candy melts with the orange candy coloring, then I dipped a small paintbrush in and painted the mold directly on the beak, but not very thick. I then used the same yellow candy melts and added some blue coloring, dipped the blunt end of the paint brush in that and them pressed it onto the eye part of the duck mold. After that seemed to have dried, I used the disposable bag with the melted yellow candy melts and filled up each mold. It worked. I hope this helps. The cake I put the candies on is in the baby shower section.
Your ducks turned out really cute! What I'm looking for is more of the marblized look. Not one section, but in a pattern? I'm getting ready to take this last batch out of the fridge as soon as I finish getting kids in bed. Then I can post a photo of how they turned out anyway.
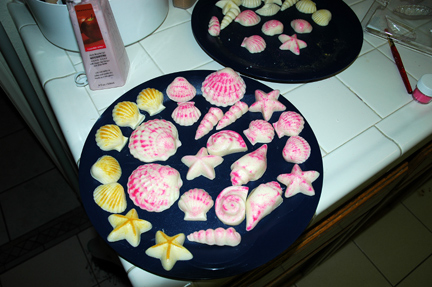
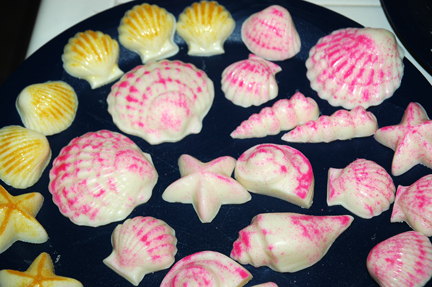
OK, The third try looks much better, but still a bit to much color I think... The goldish colored ones are my second attempt (plus the one dark pink large shell at the top of the plate). The rest are the third batch. The first batch aren't even worth taking photos of as they didn't hold any color at all.....

am presuming Wilton's melts work like all other chocolate-the paintbrush trick is a valuable one when working with candy. You can paint the molds as loree said, or you can paint after the candies have hardened and are out of the mold. I have done some absolutely gorgeous chocolates with just a simple paintbrush and edible glitter-I had people asked me where I bought them and say they must have cost a fortune lol!
For pieces this small and molds fairly detailed, the paintbrush may be the easiest way to do it. Paint your marbleing color into swirls in bottom of the mold-doesnt have to be neat, and actually looks better if they spill a bit outside the crannies. Then fill rest of the mold with your base color.
Or you could swirl it in-ie marble the chocolate the same way you marble a cake by swirling the colors. Generally you get a marble by putting dabs of each color in the mold and swirling gently with a toothpick in a few swirlies (not a lot because you want the colors to marble not blend).
If your molds were less detailed, the simple cake swirl method with a toothpick would work. But since the molds are fairly detailed and irregular shapes, I would suggest put a few dabs of each color chocolate in the mold (that will be the top that people will see) enough to make a thin layer on the bottom/sides of the mold (top of the piece) but do not fill all the way yet. Use a toothpick or skewer and drag it thru the colors a few times pulling it in swirlies to marble. Fill remainder of your mold (bottom of the piece) with your base color. That way most of your marbleing is on the outside. (With an irregular shaped mold, if you filled the mold full first and then swirled, your toothpick may get hung up in the nooks and crannies and most of the marbleing would be on the top of the mold, or what will be the bottom of the piece.)
PS A simple teaspoon or iced tea spoon (small elongated bowl and long handle) work fine when working with small amounts of chocolate just straight melted to fill molds. I would forego a pastry bag if you are working with straight melted chocolate rather than tempering-because of those burns you mentioned lol! If chocolate is tempered first, it is ideally at around 88', so will not burn your hands-only then I would consider a pastry bag.
Signed,
Chocolate Veteran of Many Holidays Spent over a Double Boiler (lol!)
I see what the difficulty is-you were trying to use straight powdered colorings? Works much better using colored chocolate and either paintbrush or swirling.
Hi, I am also trying the same thing for my sons birthday in a few weeks.
I have done some just with white chocolate, then dusted with petal dust and they look really great. Some I put different coloured petal dusts on with a shimmer on top, and that looked great.
I have also just tried milk chocolate with a little white chocolate slightly
swired in (i did in a big bowl, then spooned into the moulds) and these
came out pretty good also. I then put some gold dust on top and that
made them look even better.
Hope this helps and good luck. I'm sure your children are enjoying your
tries. I also added in a few drops of strawberry flavoured essense and that made them extra yummy.
I also found that by adding in the essense, I had to add a bit of kremelta (In the US I think the equivialent is crisco?) or else it went quite crumbly.
Yes, I was just adding the powder into the mold then pouring the melted white over that into the mold. I guess I need to swirl the color in some of the melted candies first and then pour the white to fill in. I might wait a few days for the blister on my finger to heal before trying again. The kids are asking when they can have the rejects though! LOL. I told them not before breakfast. Thanks for all the input.
Quote by @%username% on %date%
%body%