

Great Tip From My Instructor!
Decorating By newlywedws Updated 28 Sep 2014 , 10:24am by AnAngelsKiss

Yay! No more greasy hands - I was having to wrap a paper towel around the top of my bag just to get a grip on it after so many uses. At four in the morning, I'm just not up for filling another bag and just want to be done! Thanks for posting such a great tip ![]()

When I load up my small piping bag (different technique for large bag)
I have a similar technique but different. I will explain:-
Step 1
Get a tall plastic cup that is narrow on the top. Place your piping bag inside it with the top of the bag over the rim of the cup. It has to be a tall cup because in the next step
Step 2
You get a Freezer Bag (a light weight plastic) and pull one of the two corners into a point
Step 3
Push the pointy end into the hole in the end of your piping bag in the tall cup until it pokes out an inch (so it doesn't accidentally go back in the bag)
Step 4
Open the end of the freezer bag over the rim of the cup
Step 5
Now you have a firm edge (the top rim of the cup) to scrape the palette knife edge onto with your buttercream or royal icing until you have a fist full inside
Step 6
twist the plastic one turn at the open end (not the nozzle end or you will block it)
Step 7
secure the end of the outer bag with an elastic band. Cut the end of the plastic off poking out the tip leaving 1cm which you poke into the piping tip. Secure your nozzle and squeeze to remove the air bubble. Now pipe.
Step 8
As you use the icing the elastic can be rolled down the bag to create a little pressure inside the bag
Step 9
Put a small wet sponge inside the bottom of the tall plastic cup and when you are not piping place the piping bags nozzle tip down inside the cup. This keeps the nozzle tip moist and stops it blocking as it should not dry in the sponge. (No need to unblock with pins which damages the tip)
Step 10
When you have finished with the icing in the bag and you want to recolour it for another project, pull the bag out and squeeze the icing or buttercream onto your granite/glass/marble top. Palette the colour in on the flat surface and refill again.
You should never have to wash your piping bag or get sticky hands.
NB If you keep the icing minus the piping bag in a plastic tub in the fridge overnight, the end may get crusty so cut it off with scissors before squeezing out the contents in the middle of the bag to rework it.
NB This is how it was done when I was decorating easter eggs in a production process one after the other for a chocolate factory. I used the same technique in my shop.
Wedding Cake Enchantress
http://weddingcakeenchantress.blogspot.com/
Newlywedws......this is the best tip ever....I used it again yesterday, and man I just had to thank you again, I hardly had any frosting on the inside to clean out...it is awesome...best tip of the year! Thanks again for sharing! Kiss your instructor!

I'm just a newbie and taking the Wilton class. Thanks for the tip.
I used it for my last class and it was much easier then filling all the bags, even easier to transport all the different colors I wanted to use. 1 container instead of 6.
Thank you
I do a similar thing by putting the icing into gallon sized plastic storage bags...I just buy the cheap ones at the dollar store....fill and snip off the corner, then drop into the decorating bag....and you are right...saves so much time on clean up!
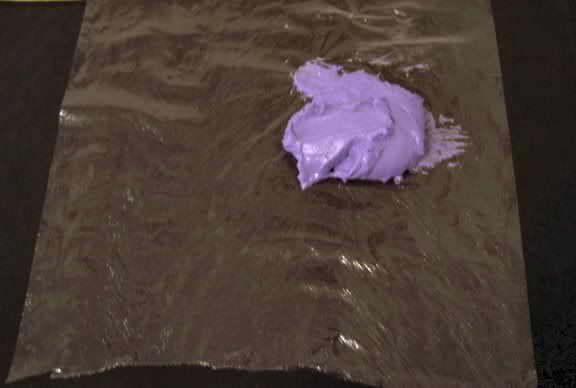
My cake decorating instructor showed a great method for filling the decorator bag with icing. It's called a "plastic wrap" method. It's pretty neat. Pictures are attached to clarify.
Step 1. Take a piece of plastic wrap about 8"-10" long. With a spatula, take a bit of frosting and place it in the center 1" away from the edge. (Pic 1)
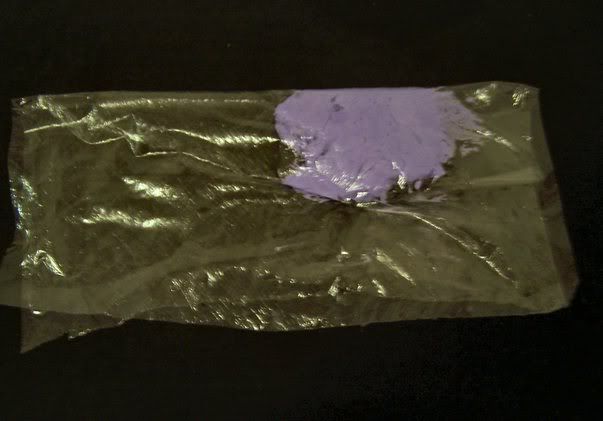
Step 2. Take one side of the plastic wrap and fold it over to the next side matching up the edge - your frosting will now be enclosed on the side of the plastic wrap (Pic 2)
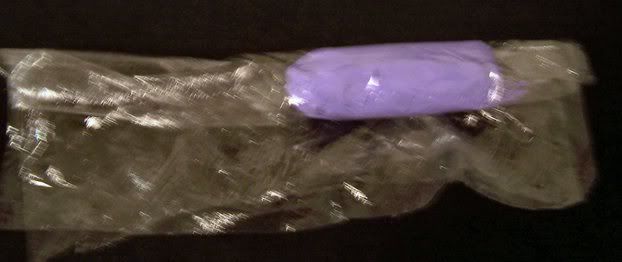
Step 3. Roll the plastic from where the frosting is to the edges (Pics 3 & 4)

Step 4: Twist the free end of the wrap (pic 5)
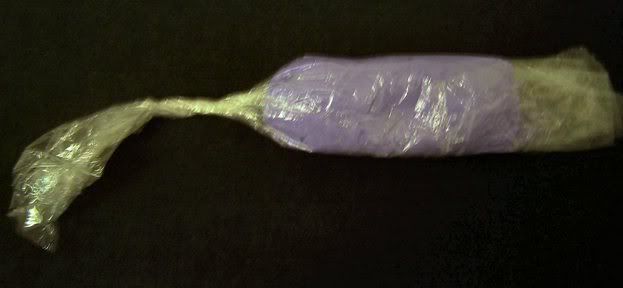
* (Optional step 5: I tie mine off in a knot -pic 6)
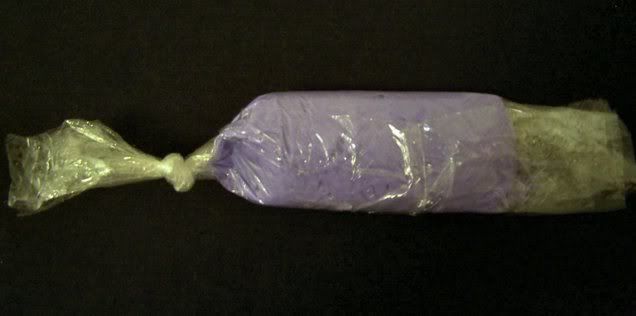
Step 5 (or 6 if you follow the optional "tie off"): You can now insert the plastic "tube" of icing into the decorating bag. (pic 7)

Just wanted to share. I think it's a pretty cool way to get the frosting in the bag and it isn't that messy either. Plus it makes switching frosting in and out so simple - if you're careful enough you won't have any transfer colour either.

Thank you for the tip. I used it for my last Wilton level one class and it worked great. The teacher asked me what the "sausage rolls" were and I mentioned this..lots of laughs but now everyone is using it. Thanks

Wow I cannot wait to try this Icing Tube tip LOVE IT!!
I read this post when newlywed posted it and just tried it last night for a JOJO's circus cake, and OMG, it saved me so much time with the 7 colors that I used. I even used one bag with the same coupler for 2 different colors because it didn't get dirty. My husband loved this tip (since he is the one who ends up washing the piping bags and tips ![]() )
)
Thank you so much for sharing,
Veronica
OK i have worked a lot of Overtime this week so i got to step # 7 and then somehow my visual went dead. I will have to come back and read this again, unless you decide to put a pictoral tutorial for slow pokes like me LOL
When I load up my small piping bag (different technique for large bag)
I have a similar technique but different. I will explain:-
Step 1
Get a tall plastic cup that is narrow on the top. Place your piping bag inside it with the top of the bag over the rim of the cup. It has to be a tall cup because in the next step
Step 2
You get a Freezer Bag (a light weight plastic) and pull one of the two corners into a point
Step 3
Push the pointy end into the hole in the end of your piping bag in the tall cup until it pokes out an inch (so it doesn't accidentally go back in the bag)
Step 4
Open the end of the freezer bag over the rim of the cup
Step 5
Now you have a firm edge (the top rim of the cup) to scrape the palette knife edge onto with your buttercream or royal icing until you have a fist full inside
Step 6
twist the plastic one turn at the open end (not the nozzle end or you will block it)
Step 7
secure the end of the outer bag with an elastic band. Cut the end of the plastic off poking out the tip leaving 1cm which you poke into the piping tip. Secure your nozzle and squeeze to remove the air bubble. Now pipe.
Step 8
As you use the icing the elastic can be rolled down the bag to create a little pressure inside the bag
Step 9
Put a small wet sponge inside the bottom of the tall plastic cup and when you are not piping place the piping bags nozzle tip down inside the cup. This keeps the nozzle tip moist and stops it blocking as it should not dry in the sponge. (No need to unblock with pins which damages the tip)
Step 10
When you have finished with the icing in the bag and you want to recolour it for another project, pull the bag out and squeeze the icing or buttercream onto your granite/glass/marble top. Palette the colour in on the flat surface and refill again.
You should never have to wash your piping bag or get sticky hands.
NB If you keep the icing minus the piping bag in a plastic tub in the fridge overnight, the end may get crusty so cut it off with scissors before squeezing out the contents in the middle of the bag to rework it.
NB This is how it was done when I was decorating easter eggs in a production process one after the other for a chocolate factory. I used the same technique in my shop.
Wedding Cake Enchantress
http://weddingcakeenchantress.blogspot.com/

it is under the numbers on the bottom it says:Watch this topic for replies

I didn't know you could do that! Wow! thanks!!!!

Now that's a great idea!! Funny, I had this in the "watched topics" section but I haven't received one email notice on it! :cry;


How awesome I will certainly be using that tip on next weeks cake. The fact that I can use it to do some color stripping in the bag for what I have planned is awesome and to think of the money I will save not having to change bags so often just the plugs is fabulous. Thanks for sharing ![]()
I love this tip! I'll definitely use this little gem over and over! Thank you so much!

i do this tip today and i must admit i was a little distrussted, but wath a surprise: its work awwwwwweeeeeeeeeeeeeesooooooooooooooome i never stop to be thanksful to you for share this tip with us, thanks, thanks ,thanks ...no more messy kitchen with it. i hate a lot clean the damn bags ;P


I would just like to say how thrilled I am to learn that I'm not the only one with a fist full of frosting every time! I'm new to cake decorating and thought I MUST have been doing something wrong! I am definately going to try this technique on my next cake! Thank you!
I just saw this on a DVD for Airbrushing! What a need idea and a timesaver! I am new instructor for Wilton, and have a class tonight, and I was planning on sharing this too!
Kim
Quote by @%username% on %date%
%body%