


I have done this method in the past and never really happy with my results........ being able to see the lines when I fill in the image. Should I outline my design and then thin my icing out to fill it in or is it normal to see the lines when you fill in the image using the pin prick method??

I assume you are writing about RI (?). I usually outline on wax paper; thin the icing to flow consistency and fill the design (note: I don't wait for the outline to dry else the lines are more prominent); before I 'pin prick' I lightly tap the wax paper on the table and this usually fills in the design and releases any bubbles. If any holes exist I use the pin-prick method. Usually I can't see my outline since it melds with the flow.
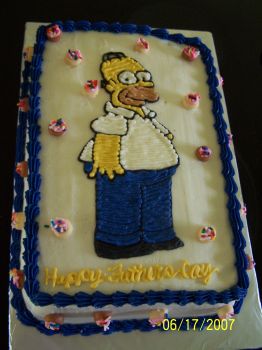
Sorry, I guess I didn't clarify..... I was talking about doing a pin prick transfer onto a cake. Poking the holes in your image and then rubbing it onto the cake...... outlining the image and then filling it in. I'm unsure if the icing should be thinned for the filling in process. In the past I haven't thinned my icing and you can see the lines...... you can really tell by my Homer Simpson picture below.

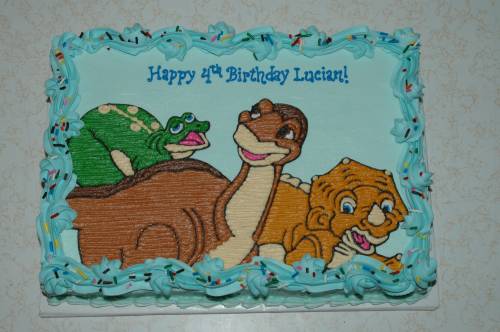
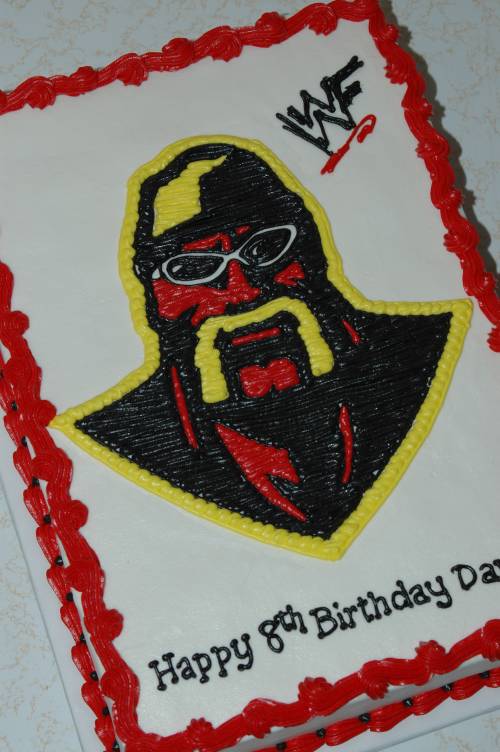
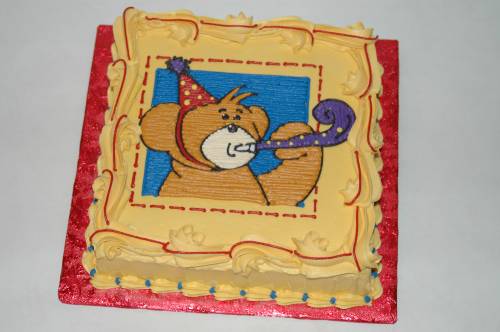
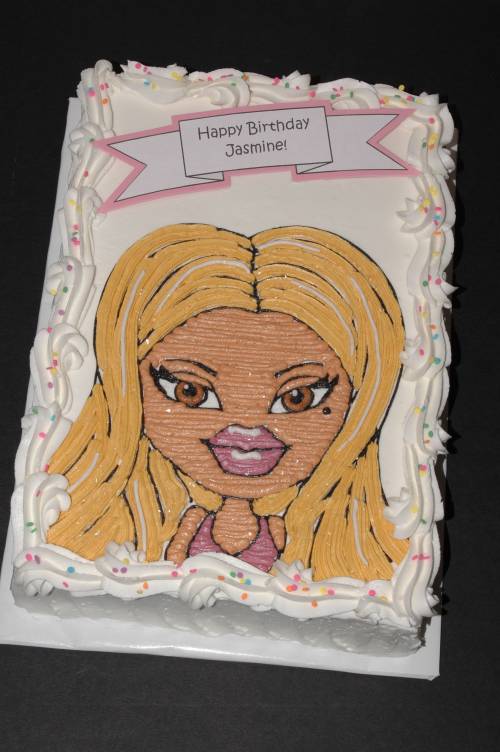
I use the pin-prick method nearly exclusively to transfer my images. You can certainly thin down your BC to make the lines less apparent, however, I use full-strength BC to fill-in my designs and have found that if you're nice n' neat with your piping, the lines can look pretty nice as is! I've used stars sometimes to pipe and sometimes both stars and lines....but lines are easier to me! I've attached some examples of my work using this method:
BTW....your cake looks wonderful!

 Thanks for your help!!

Maybe you can try a damp paint brush to smooth out the lines? Or what about a paper towel after it has crusted?
Pin Prick is taking a picture (coloring book page or just an image printed on a piece of paper) going over the entire picture poking holes using a straight pin. Once you are done, place the paper on top of your cake (make sure that your icing has crusted a bit) and lightly smooth it....... this will transfer the image onto your cake. Then follow your dots and outline your picture using tip 2 or 3 (even heard some use tip 1 - personally, it's too small for me so I use a 2). After you have outlined your entire picture, then fill in your design with straight lines. Check out cambo's pictures..... her work is awesome. You have to be really patient to make sure that your design looks good and not hurry like I did on my Homer cake (above). LOL!!
Tracie & Cambo - those cakes are great!!
I have always wanted to try doing this, but never been brave enough. I first read about this at the wilton site forums. Not finding enough information at the time... i thought i'll try it on my own. lol
I did it on fondant (my lumpy cake) and poked the holes straight on the cake. then just traced it w/ a black edible marker. You can sooooooo see the little holes on the cake. LOL but it was just practice.
Good to know how it's really done, i think a tutorial on this site would be great.
thanks!
Kat

Yes, you're correct! I use a block of styrofoam to place my image on while poking the holes! I also use a safety pen (opened and straightened out) to poke the holes! Once you're finished poking the holes around every outline you want to transfer, it makes that "braille" affect on the back of the paper, so when you rub it gently onto your cake, you have a "braille' trail to follow with your icing! Make sure your buttercream is crusted well, and you don't want to the leave the paper template on your cake too long as it will begin to soak up the grease from the icing and will want to stick!


Thank you so much for posting the detailed instructions. I have been doing FBCT for years and would love to have another option!! I can't wait to try it.


If you look at Kathy's Kakes, she is very helpful. She use a glaze in pin pick. Here cakes are very beautiful.
She very helpful to me and shared her tips and recipe. I believe the article was in an old ACD magazine. But look at her pictures, the glaze is great.
http://www.kathyskakesllc.com/kidsbirthdaycakes.html
Is this an alternate to FBCT?
Yes and no.
The FBCT is another way of doing a design on a cake. Kinda like a chocolate transfer or color flow piece. They are ways to do a design off the cake and put it on the cake.
The pin prick would be another way of putting an outline of an image down on your cake so you can outline it with out having to free hand. Other ways to do this is by using a cookie cutter in the shape you need or the piping gel transfer. For the piping gel transfer you out line your image on wax paper in piping gel then lay that over your cake and lightly smooth over the top of the wax paper. When you pull it away it will leave the piping gel on your icing in the outline then you can come over that with your buttercream. Some people will also cut out their images and use a tooth pick to trace around them on the cake.

So how does one do the FBCT? I love learning new ways. Ya'll are such great teachers.
Here's a link to the FBCT tutorial from CC: http://www.cakecentral.com/article12-How-To-Create-a-Frozen-Buttercream-Transfer.html

I find that I cant really see my image on the cake with the pin prick method. Any one with more experience have any suggestions for making the image a bit more visable? I'm very impressed by Cambo's work and I like the lines in the fill in work (I thought Homer Simpson never looked better !)

Once the icing has crusted, you can smooth your lines if you don't like them. I have had to do this with a FBCT when I had a problem. I had to fill in areas that stuck and after the icing crusted, I no problems smoothing it with my Viva and roller and it looked flat.
darkchocolate
I always do the pin prick method for writing and sometimes on images. I find after I transfer the image, it's harder to see under bright lights. Dim the lights a bit and see if it helps. Also, it doesn't hurt to stick a toothpick through some of the holes in the image if the paper alone isn't making enough of an indent for you.
Thanks ladeebug for the toothpick & lights suggestions! I really want to use this method more especially since Edible Images are SO expensive (for the cartoon characters)
BTW: when I a child, my mom used to call me ladybug all time

Those cakes look great! I have discovered another easy way of getting a design onto a cake: I get most of my pictures off the computer, so first I print up the picture, then I cut the picture out so I have the exact shape I want. I press the picture down onto my crusted icing on my cake. I gently push along the edge, so it leaves an indentation. I peel the paper off the cake, and there is the entire outline of my picture! I simply outline it with my black tip 2 or 3, and fill it in. I almost always use a damp paintbrush to smooth my designs, as I don't like the lines to show (although I really liked the lines in those other cakes posted - may have to try that!). If you're interested, the school bus, margarita, horse, Betty Boop, and pig (Charlotte's Web) cakes in my photos have all been done this way. If the picture is a little more complicated, meaning it has details that I don't want to freehand (inside the outline), then I go back to my cut out picture and basically make a jigsaw puzzle out of it. Example, for my Betty Boop cake, I cut out her hair, placed the hair back on my cake using the outline as a guide and pressed gently....lifted it up, and voila, her whole hairstyle was there. Did the same with her dress. It sounds more confusing than it is, it's actually very simple and very effective! ![]()
I find that I cant really see my image on the cake with the pin prick method. Any one with more experience have any suggestions for making the image a bit more visable?
Glad I'm not the only one with this problem. I tried the pin prick method a few weeks ago and couldn't see my image at all, so I haven't tried it again, yet. I've been wanting to try it again because I don't like something like this getting the best of me. ![]()

I have only done ONE FBCT (at&t logo in my pics) I ended up making about 5 of them until i found one that i could actually use. I made a big mess!!
I will try the pin method next time. Someone posted a method using piping gel traced on wax paper and then used to indent the lines on the cake. i will try to find the link and post it.
I find that I cant really see my image on the cake with the pin prick method. Any one with more experience have any suggestions for making the image a bit more visable?
Glad I'm not the only one with this problem. I tried the pin prick method a few weeks ago and couldn't see my image at all, so I haven't tried it again, yet. I've been wanting to try it again because I don't like something like this getting the best of me.
A desk lamp lowered to just a few inches above and behind the cake will let you see the dotted lines better.
Quote by @%username% on %date%
%body%