

Hello everyone!
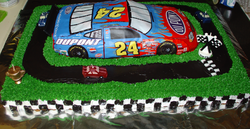
I am new here and fron what I can see you are all very experienced in making/baking cakes. I have 2 boys, one will be 5 next week and he really wants a Jeff Gordon cake. I found the following picture and he likes the looks of it so I am going to try and do one like it. I already have the car cake pan and decals, but any suggestions how to make the rest of the cake look a little "cleaner"? Should I use just BC or accent in places with fondant? I even have the candles that are shown on this cake ![]()
Also I am using the following cake mix and have made 2 batches so far and they both sunk in the middle. Any suggestins why this would be happening? It still tastes amazing (it is from the Cak Mix Doctor)
White Chocolate Cake
6 ounces white chocolate, coarsely chopped
1 box plain white cake mix (Duncan Hines)
2/3 cup water
1/2 cup vegetable oil
3 extra-large eggs
1 teaspoon Vanilla Extract
Preheat oven to 325 Degrees. Place rack in center of the oven. Generously grease two 9-inch cake pans with solid vegetable shortening then dust with flour; shake out the excess flour. Set aside pans.
Melt white chocolate in a small saucepan over low heat, stirring constantly, 3 to 4 minutes. Remove from heat and let cool slightly.
In a large bowl, place the cake mix, water, vegetable oil, and eggs. Pour in the slightly cooled white chocolate. Blend with a mixer, on low, for 1 minute; stop the machine and scrape down the sides of the bowl with a rubber spatula. Increase mixer speed to medium and mix for 2 minutes; scrape down more if needed. The batter should look well blended.
Divide the batter evenly between the prepared cake pans, smoothing it out with a rubber spatula. Place the pans on a cookie sheet, side by side in the oven.
Bake the cakes until they are golden brown and spring back slightly when lightly pressed with your finger, about 38 minutes. Remove the pans from the oven and place them on wire racks to cool for 10 minutes. After 10 minutes, run a dinner knife around the edge of each layer and invert each onto a rack, then invert again on another rack so that the cakes are right side up. Allow to cool completely, at least 30 minutes or more.
luvalot.... are you talking about having trouble baking the base cakes that are under the car cake?
I have made Nascar cakes; but I made several 1/4 sheet cakes and used a wedding cake construction method for sculpting them. Whole car and board weighed 30#.
But, I have also sculpted smaller Nascar cakes, by using a couple of 1/4 sheet cakes.
Don't know if I can be of much help to you. I have never made a white chocolate cake. But... I only use Duncan Hines mixes. I think they are the best! I have "The Cake Doctor Book" but couldn't find the receipe that you quoted.
I've baked LOTS of wedding and custom cakes. Usually, the reason that a cake falls in the middle is because it is under baked, or possibly too much liquid is in the mix. Duncan Hines says to bake their cakes at 350*. When I bake some 1/4 sheet cakes, to cut my bridal tasting samples from; I bake them in just a FOIL 1/4 sheet pan for just 35 minutes. If I'm baking in the reg. Wilton aluminum cake pans, I bake the 2" tall pans for 1 hour !
After I have prepared my cake pan by using Crisco shortening spread all over bottom and sides of pans and then take my fingers and wipe all the excess grease off. Then I put flour in the greased pan and tap the pan in my hand, using a rolling motion to spread the flour so that it covers ALL of the inside of the pan. Then I drop it on the counter. That releases any excess flour that I can pour and tap out of the cake pan.
I then pour my prepared cake mix, from a little height (about a foot) above the pan. POUR IT SLOWLY.... over the lip of your mixing bowl, and into the waiting cake pan... like a waterfall. As this is pouring, you will see any air bubbles stretch and break, as it goes into your pan. This prevents any air tunnels in your baked cake.
I always use the silver colored 'cloth' baking strips (Wilton sells them) that have been soaking in cold water to wrap around outside edge of cake pan and pinned the ends together. This helps keep the batter from pushing into the middle of the pan and creating a mini-mountain. Your cake bakes more evenly.
As the cake is getting to the last of it's baking time, according to my timer, I use a thin bamboo skewer inserted into the center of the cake. If it comes out clean (no crumbs or wet) and I see the cake 'barely' start to pull away from the sides of the pan, it's usually done. If not.... I leave it in for another 5+ minutes and recheck.
I then set the baked cakes on my cooling racks. If I don't get back to them and they cool down all the way, I just turn them upside down, onto my cake board surface and use a hair dryer. I move this all around the metal bottom of the pan. This re-warms the grease and floured inside surface and lets your cake drop softly. No need to cut around the inside edges and no chunks of cake left in the pan.
That's how I do my baking and it's worked for many years.
Not sure about what you mean.... "how to make the rest of the cake look a little "cleaner"? One idea, if you don't like the busyness of the pictured car cake, would be to use a pastel tone of one of the colors used on the race car, for the icing color. Then just make, or buy a couple of racing flags, criss-crossed standing on the cake. OR.... get some checkerboard wrapping paper and cover it with clear contact paper to use as your cake board. Then just use a grass tip to pipe a little grass, as your cake border and any where else that you wish to put some grass tuffs.
Hope this helps..... Good Luck and have fun. We've all learned, usually the hard way, that sucess and confidence comes after lots of frustrating hours. The difficult things are the best lessons ... just never give up. Your sons will love anything that you do... afterall, it's done with love and that's the most important lesson of all.
Happy Baking~ NightIcer
Thank you for your info! What do you mean by wedding construction? I was just planning on baking the car cake and 4 9x9 cakes (This way it is a bit bigger then the 2 9x13) and then just placing the car on top of the 4 9x9 that would be placed together in a square. Is this not a good idea? I only start Wilton 1 this Tuesdya and I need this cake done for my son by this Saturday.
TIA,
Janet

Janet~
I looked through my CMD book and couldn't find the recipe you stated either. The closest I could find was a pound cake and the Love Cake. What page is the recipe on?
As for the decorating. I would first make a patern of the base of your car, just trace the pan onto some paper. Position this pattern on your sheet cake so you know exactly where it will go. If the board will be bigger than the car itself, just use the board-you can always cover it up later with icing to hide it.
Then I would outline your black track and fill it in. I would probably use a large round tip to fill it in then take a spatula and smooth it out. Doing this first allows you to make a few "mistakes" and you can cover it up with your grass later. For the grass I would use tip #233l Just practice with it a little so you get the grass effect, if you haven't used the tip before.
As for the checkered flag on the side, I have one in my pictures that all I did was take a star tip and make one square with four stars. Alternate colors when doing this, I had two bags set up. If you want to fill up the whole side then just divide your heigth in half and make squares all around your cake.
I hope this helps. If you need more explination on what I said just let me know. Can't wait to see your cake, i have wanted to try one of those car kits, but haven't had a good reason too yet.
Leily
Thanks! Are you saying I should put the car on a board before placing it on top of the cake? Do I also use dowels then? And stupid question, but doesn't the cake look silly one the car is gone (eaten)? if there was just a board on top of it or do you ice under the board as well? ANd do you just take dowels out before serving the cake? Sorry so many questions as I am very new at this ![]()
Thanks again!
BTW, I have to do another cake the following day as well for family (we always have 2 big parties). I will be using 2 9x13 with the following edible image put on it. Any suggestions for the cake? I was not sure what else to do on it as the image takes up the whole top of the cake...
Hi again, Janet...
Just FYI.... You asked about "wedding cake construction". By that,I mean, that any time I'm placing more layers of cake on top of at least 2 previous layers of cake, I put dowels in the bottom cake. Then I would have cake cardboards (wrapped in plastic wrap, or tin foil), between the two sections. Anytime you are having the cardboard cake boards touching 'cake' you want to have them 'moisture proof', so they don't get mushy and lose their strength. I can remember something better, if I can see pictures. If you have one of the Wilton 'annual' Yearbooks, it will have instructions for this. In the 2006 Yearbook, you would look on pg. 110. Here is a web page that will show you the same thing. Here's a link for you:
http://www.wilton.com/wedding/makecake/building/dowelrod/dowel_tiered.cfm
Remember, cake is very crushable. When I make the big car cakes, or any thing that I am constructing (house, big animals, etc.) and I am placing more layers of cake on top of 2 existing layers.... I use the dowel /board method, and that's what holds up the extra weight, so that the upper cakes don't squash down into the lower ones and nothing 'leans', when the dowels are cut exactly the same height. (Especially important in constructing wedding cakes.)
Now.... Before you start to 'worry' ![]() about all this new stuff; no need to
about all this new stuff; no need to ![]() because, in the cake that you are describing, it sounds like you won't need to do any of the 'construction' things; because you will just have one layer under the car cake. The car cake is probably light enough not to sink into the bottom layer. Basically, it is the same as if you are just doing a reg. 2-layer cake. Ahhh, back on familiar ground.
because, in the cake that you are describing, it sounds like you won't need to do any of the 'construction' things; because you will just have one layer under the car cake. The car cake is probably light enough not to sink into the bottom layer. Basically, it is the same as if you are just doing a reg. 2-layer cake. Ahhh, back on familiar ground. 
I wouldn't have even gone into this, but you asked about wedd. cake construction. It's really not hard when you can see it done and just go step by step.... just logical... as in most things. We all started at Cakes 101. Anytime I wasn't sure about something, I just asked someone, or started looking into books for the information. That was before the days of computers. ![]()
Now, getting back to your project:
It's fine to use your 4- 9x9 cakes under the car. Just remember that whenever you are putting two pieces of cake together, you need them to stick together. You'll want to put frosting on their edges, to help hold them to each other. Be sure to put some swipes of frosting, on your cake board, where each of your square cakes will set, also. This helps hold them in place, on the board. You want to keep your whole cake from sliding around, on cake board when it's moved. ![]() (Your instructor will tell you about this, but since you need your son's cake before that day I thought I would say something. I don't know how far you are in cakes, yet.) Better to be safe. I never want any 'surprises'
(Your instructor will tell you about this, but since you need your son's cake before that day I thought I would say something. I don't know how far you are in cakes, yet.) Better to be safe. I never want any 'surprises' ![]()
![]()
All decorators have had their share of those! The more cakes you make, the better you become. Cake decorating is fun and creative. The best part is giving it to someone and see their face light up. Makes all the effort worthwhile. We get as much out of it, as they do. Hope this helps. It will look great. Have fun. You're going to love taking the cake classes. Just be sure to practice in-between the lessons.
Janet...
You can use 2" or 3", just depends on how much cake you want to have. If your having trouble with the batter getting done; I would go with just the 2" deep pans, for now.
I rarely use my 3" deep pans. When I have, it was because the design of a wedding cake called for it. There are probably lots of decorators that prefer the 3". Most all the pan sets are the 2" deep ones.
I fill my cake pans about 2/3 full.... just so they don't overflow while baking. After they are cool, I release them from the pan and then re-flip them so that they are topside up (the cake side that you could see, as it baked). I take my cake saw (leveler... page135 in the 2006 Wilton Yearbook) and cut off some the layer, so that it is perfectly flat. That's important! It gives your finished cake a more professional look and lets the other layer rest 'flat' on it, if you are doing a 2-layer cake. I ALWAYS, always... level my layers. If you don't have a cake leveler, you can use a long bladed knife. It's just harder to cut the cake layer at an equal height. Before I had a big cake leveler, I used a wire. I wrapped the two ends around my two pointer fingers (like you would do to hold dental floss, in order to floss your teeth) ![]() By keeping the 'thin' wire pulled taunt, just pull it through your cake layer, zig zagging it back and forth, as you pull it through. Start it at one end, or side, of your cake layer. Just be sure to hold each hand at the same height, by touching the counter / table. This helps to steady your hands as you guide the wire through the layer. Someone once told me that they used dental floss to do this! If you have to invest in some baking pans, I would buy the 2" deep ones first. (Just my opinion.)
By keeping the 'thin' wire pulled taunt, just pull it through your cake layer, zig zagging it back and forth, as you pull it through. Start it at one end, or side, of your cake layer. Just be sure to hold each hand at the same height, by touching the counter / table. This helps to steady your hands as you guide the wire through the layer. Someone once told me that they used dental floss to do this! If you have to invest in some baking pans, I would buy the 2" deep ones first. (Just my opinion.)
I've never used a car kit. I'm looking at your car picture. I'm trying to figure out what the 'color' part is; icing, or rice paper? Anyway, when I've sculpted my cars, I had air brushed the colors on them. Then I would use piping gel (cake stores sell this... it's clear) on all the windows. I would pipe it on my windows, head and tail lights, over the top of my colored icing by using a 'flat' opening tube (#45)... you could use a (#104) rose tip, also, if that's what you have. Once you have a thin layer of piping gel on the windsheild, or other windows, just smooth it out 'carefully' with a small 'angled' spatula. This makes the windows look more like glass.
BTW... you're welcome for the info. Glad we could help.
Quote by @%username% on %date%
%body%