


Easy Chocolate Transfers For Newbies
Decorating By SquirrellyCakes Updated 29 Nov 2016 , 4:40pm by 2txmedics
Here is something that is actually much easier than a buttercream transfer, but works about the same way, so you can follow the tutorial for Frozen Buttercream Transfers, but omit refrigerating or freezing because you don't need to.
There is a link with good instructions for doing a chocolate transfer:
http://www.geocities.com/heathers_cakes2000/chocolatedemo.html?1109787013625
I use an icing bag and a number 1 writing tip to do the outlining first, mainly because I am too lazy to make up parchment bags, which is really the best way to do the outlining. I use the dark chocolate candy melts and add the Wilton Candy Colour black to them to get black for outlining, if you use regular colouring on its own, it can cause the chocolate to seize but there is an Americolor product available that lets you use your regular Americolor colours in addition to it and you will be fine. You are working in reverse, so reverse your print just as you would a buttercream tranfer picture. Cover your picture with parchment paper and tape it down to your work surface, again the same as BCT's. I use a spoon and a toothpick to fill in the small transfers, but you can use again the parchment bags or a squeeze bottle. Whatever appears on the outside first, you do first, so the middle of the eye, then the white, that kind of thing. When I am done with all of the colours, I place a popsicle stick or cookie stick on top and then add more melted candy, someone had done a tutorial demonstration here on the site of that part a few days ago. If I am not using a stick, I just put an extra coat on top, to add strength. These set up quickly, remember to let the outlining set up first, then each colour as you use it, then once they are set, add that extra coat for strength and let it set. Usually no more than 20-25 minutes complete. I melt the candy in small pyrex custard cups, for 30 second increments of time, usually takes a total of about 1 minute but don't do it all at one time or the chocolate can seize up. If it does, add a bit of Crisco and reheat.
If there is a lot of detail and you have several to do, well they can take quite a bit of time, but they are simple to do and you can get good results.
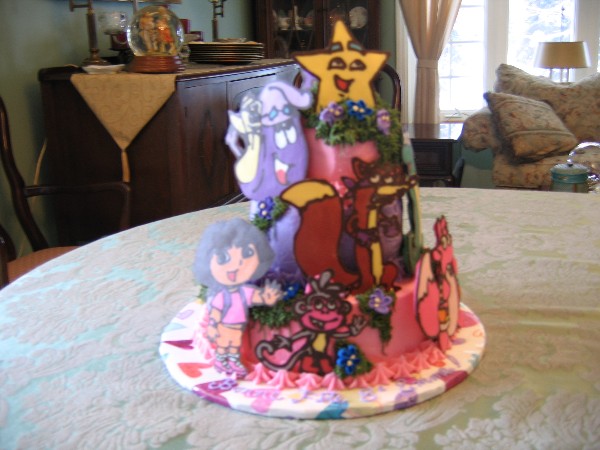
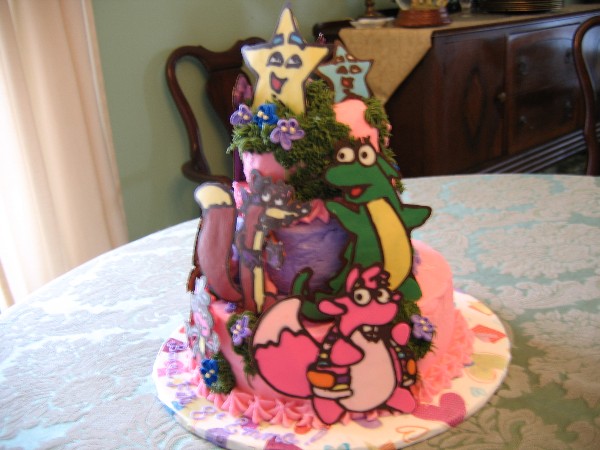
Here is the latest Dora and friends cake I did with them. I attached them using buttercream behind them.
Excuse the pictures, I was in a hurry and didn't realize the light coming in the window would make Dora and Boots appear faded.
Hugs Squirrelly


That's one awesome cake Squirrelly. Thanks for the tips and info. The link unfortunately doesn't work
Darn, it did that for awhile yesterday too, hhmn, try again later? Otherwise just follow Cali4Dawn's Frozen Buttercream Transfer tutorial but no need to refrigerate or freeze and use melted candy melts instead of icing.
Hugs Squirrelly

Wow great tips and link Squirrelly - I will give this a try! Looks fun! Love your cake too! 
Thanks

Thanks all, they are actually fun to do and you don't have to worry about wormies to smooth out and such, haha, bonus! Older children can make these too because the chocolate is not extremely hot when you use it.
Just thought I would mention it and post a picture so people could see that it doesn't take a lot of practice to get a pretty good effect with them. You can also do a large one for the top of your cake but in that case, I go much thinner in the depth of the chocolate and you would want to cut through the chocolate with a warm knife.
Hugs Squirrelly


Wow, you've been holding out on us...your design is fantastic.
I'm willing to try anything that means less work to do ![]()
Is this like the method that Dawn did?
Once again, you are a remarkable woman with talents that you keep hidden from us...naughty, naughty, naughty; just for this, you lose one of those nuts ![]()
![]()
Squirrelly, I am assuming that if this is done just like the FBCT and placed directly on the cake, then it will not cut the same as the FBCT. It will be much harder.

That is great. I like FBCT, but this sounds like it would be alot easier and take alot less time. Thanks a bunch for sharing!


I actually use this technique quite a bit. I LOVE it!! And customers LOVE getting chocolate on their cakes!!!
candyladyhelen....you are right, the chocolate gets hard so you can't cut through it like a FBCT. Most times I've used chocolate transfer on top....people usually just break off pieces and put it on their slice of cake.
Wow, I never thought of it being able to break off really well! Ok, now I MUST try it since I have tons of candy wafers at all time in the house!!!!! I may have found a substitute for FBCT!!!!!

This is the same technique I used for my einstein cake in my photos and on a cake I hope to post tonight. I really like it because I don't worry so much about breaking and drying time as you do with other techniques.


Thanks SquirrellyCakes,
I need to make a Strawberry Shortcake Birthday Cake and then a Batman/Spiderman Birthday Cake both for 01/24.
I have never done Frozen Buttercream Transfers. . . but my colorflow birds from the Wilton class broke apart after letting them dry for 2 weeks!
Tamara

Wonderful job, Squirrelly!!!!
Do these chocolate transfers get wrinkle lines in them from the parchment like the frozen transfers do??
I don't mean the wormy lines in the icing. I mean the wrinkle impressions from the wax paper after it has been frozen??
I hope I'm explaining this alright.
Purple ![]()
Wow, you've been holding out on us...your design is fantastic.
I'm willing to try anything that means less work to do
Is this like the method that Dawn did?
Once again, you are a remarkable woman with talents that you keep hidden from us...naughty, naughty, naughty; just for this, you lose one of those nuts
Keep your paws off my nuts, repeat...Haha!
Yes, it is done exactly the same way you do a buttercream transfer like Dawn did the tutorial for, except you are using melted candy melts and you don't need to refrigerate or freeze to set. Some people on the site also use these and attach them to cookies instead of using royal icing.
You can also make any kind of decoration in the same manner, the work you would normally do with royal icing, like lattice hearts, things like that, instead can be made from the candy melts and they are less fragile and are not affected by buttercream. You can make Princess tiaras, just tape the pattern and parchment around a large can to shape while you do them, same idea, except for the tiara, and the lattice hearts and such you are going to use the up side as the good side, not the down side.
Hugs Squirrelly

This sounds like something fun to do. What wormy things are you talking about with the FBCT . I don't do them so I dont know, but I'm curious. ![]()
This sounds like something fun to do. What wormy things are you talking about with the FBCT . I don't do them so I dont know, but I'm curious.
Haha, well when you do the fill in, people usually use a writing type of tip and if they don't press down afterwards enough, with the buttercream transfers you could end up with this worm-like appearance on the good side of the transfer. Basically it is because the icing didn't flow out enough. But when you do a chocolate transfer, because the chocolate is melted, it automatically flows and fills in and you don't get this problem.
Hugs Squirrelly
beautiful! How did you color the chocolate? Or did you use already-colored melts?
You are VERY talented.
Squirrelly Cakes,
Ok, that cake is awesome. I have a few questions for you before I tempt the transfers.
1) I know you will need the chocolate (brown) melts to make the black. However, if you were just starting out would you just purchase a large amount of the white melts and color them or would you purchase individual colored melts?
2) I purchased every set of the Americolor that they have out on market. Will I be able to color the melts with the regular Americolors. I also purchased all of the Amerimist for the airbrush I am not sure if they would work.
3) Is there a certain brand of melts you like better than others? Where do you like to purchase your melts? I will have to order them via internet, Naples Italy is very limited on their cake decorating supplies.
Thanks for all of your help. I have been afraid to try the FBCT, but I will try this once I know what to purchase....Once again thanks......Kim
Squirrely Cakes..so good to see your name again!..as always..your suggestions are terrific..and they work..great cake..trying the buttercream transfers seemed too daunting..this I can do..happy icing, Chocolate1
Quote by @%username% on %date%
%body%