

What Am I Doing Wrong With My Roses?
Decorating By sheilasite Updated 24 Jul 2009 , 2:18am by madgeowens
Hi everyone - I am trying to make buttercream roses and am using
tips 150 and 104, standard rose tips, for some reason the leafs to my
roses come out cracked all the time, they still look pretty but not
so much like a rose as much as another type of flower. I want a smooth
top petal rather than a cracked one and can't figure out what is wrong with
my technique - could it be the frosting is too stiff? I like to make my buttercream a bit firmer to hold up better and crust over so I am not sure if that is the problem or not, any tips would be greatly appreciated!
Thanks!
Sheila
Hi, I have the same problem. When I can get a rose, it comes out with the edge of the petal being jagged. From what I've been told it's that my BC is too stiff.
I still haven't mastered the rose. When I have a BC that isn't stiff I end up with flat cabbages. I'm still working on it. I have a nice batch sitting on my counter now, I may go home and play with it some more tonight. But I'm getting to the point where I don't even want to think about those silly things.
I have had several people tell me that they look really pretty that way, and some even say they like them that way, but I just want them to look perfect.
From my experience it is too stiff, and getting that balance can be really hard. You can try adding a little piping gel to the buttercream and that might help. The other thing is, when i first starting making roses - while i was following the instructions in the wilton book they never came out. I had to play around with it and find a different way to do them ( i don't angle my wrist i angle the nail) and I stopped getting the jagged petals because my movements were smoother.
Hope that helps!

I was on a couple of weeks ago and another girl was having the same issue. I myself have had that happen and I thought I was doing something wrong, But someone on here said that is how the roses are really supposed to look! You should be using stiff b/c for roses. You could try some light corn syrup for a smoother texture if you don't like the way they are turning out. Good Luck!

Everything you've been told is true but also sometimes the tip itself may need to be opened at the small end just a teensy tiny bit. I was told to do this years ago by my WI. She used a corsage pin to do it. One other thing that can do this is if the frosting is not smooth-if it has powdered sugar pieces that aren't mixed completely.
hi - thanks for all your thoughts and ideas, I will keep trying,
they do come out pretty but I would just love for them to be
smooth and not sagging, the buttercream consistency is
probably the trick!
thanks for sharing
sheila
Hi everyone - I am trying to make buttercream roses and am using
tips 150 and 104, standard rose tips, for some reason the leafs to my
roses come out cracked all the time, they still look pretty but not
so much like a rose as much as another type of flower. I want a smooth
top petal rather than a cracked one and can't figure out what is wrong with
my technique - could it be the frosting is too stiff? I like to make my buttercream a bit firmer to hold up better and crust over so I am not sure if that is the problem or not, any tips would be greatly appreciated!
Thanks!
Sheila
Your icing is probably not too stiff, but rather your tip is too small. Try using tip #124... it's big enough to get firm icing through unlike the 104 that's so narrow on top. (by the time the petal edges come out of that tip they are so thin, of course they're going to break or look jagged.)
Unlimited -EUREKA!!!! I know this was not my thread, but I hope the OP tries your advice like I did.
I was going to try again this afternoon, but when I saw your post about a bigger tip, I tried that too. Well, this was the first time that I made anything that even looked close to a rose!!!
It's a little warm in my house so my bc was a little soft, but no jagged edges, no cabbages, actual (well almost) roses. I still need to practice, but since my BC is the same every time I make it I know now it's not that, so I just need to practice.
Thank you!!!!
Great! Now, are you making them on a flat head rose nail or on a stick? It's faster if you learn how to make them on a stick without the starting blob on the big nail and you'll have more control over how your last row of petals look too. After you first make your bud, keep your tip upright for your first couple of petals (they'll be standing tall and won't collapse to look like cabbages!) Hope this helps more!
Unlimited, can you do a step by step or even better a visual of making a rose on a stick?I have made them but I need to see someone do one correctly and then try it again. Your writing with icing is awesome by the way.
Unlimited, can you do a step by step or even better a visual of making a rose on a stick?I have made them but I need to see someone do one correctly and then try it again. Your writing with icing is awesome by the way.
Certainly! I'll work on that.

Your icing could be too dry. When you take a little bit of icing out of the bowl you should be able to roll it in a ball, but have it feel sticky. If it doesn't feel sticky it is too dry, which is not the same thing as too stiff. If it sticks and comes off on your finger it is too soft.
To make it more creamy you want to add about a tablespoon of crisco per cup of icing or about a teaspoon of piping gel per cup of icing. This will make it creamy with out thinning it down any.
The cracked edges can also be caused by piping too slow and turning your nail too fast, which pulls and stretches the icing.
Thanks for posting this. I can't wait to get home and try it your way. I have made them but I think I can improve on them. I take them off me stick by using a styro plate and pushing the stick through it and letting them air dry for a while and then put them on the cake. Thanks again.
You're very welcome all (or is it "y'all?)! Glad I could help.
I finished responding to the other current thread about buttercream roses on a stick, so I thought I'd paste it here as well just in case you didn't catch it there:
In response to your questions... no, I dont use scissors to take the roses off the stick. Its not the most productive way if you have to put your bag down to grab another tool (the scissors) to run up the nail/stick and then use another step to wipe it off the scissors. The name of the game is to NOT need to let go of your bag and nail/stick.
I know... I should have shown where I was putting them (not in my mouth! Ha!), but I was trying to avoid that for a reason. (If I show you all of my secretsI keeeeeel you!) I use several custom-fabricated pieces of equipment for speed and ease. Im working with a patent lawyer and fabricators to mass produce an entirely different item but still within the cake industry and had planned to include a free demonstration of how to make 600 roses per hour with each purchase.
I dont think its any big secret how to be like a machine and make roses fast if you figure out how to use your tools and equipment to your advantage, so Ill spill the beans. (Ill try to make another videobut for now, Ill explain what you can do.)
If you use a styrofoam plate and it works for youthats great, its a good idea or concept, but its not the most productive way since you not only need to put your bag down, but you also need to use both hands; one to pick up the plate with, and the other to thread the nail/stick through the plate with. I guarantee you that production line facilities dont use styro plates for thisthey use full size sheet cake pans for everything and store the pans on pan racks or in enclosed cabinets.
Youll need:
1=Full size BUN sheet cake pan (approx. 18 x 24)
?=Bakery pan liners (parchment-type paper)
1=Optional 20 custom-fabricated metal rod with three 1-2 spikes
or Optional 20 custom-fabricated wooden rod with three 1-2 hardware nails
First of all, you need to modify one of your full size BUN pans by
1.) cutting off two corners,
2.) folding down the entire edge of that end of the pan, and
3.) cutting notches out of the lipped area up to the bend like this:
(Can you see that the corners are gone and can you tell that the notches
are cut into the rolled lip edge that used to be up as in one of the pan walls?)
(before you cut the notches, read the Notch Note below.)
It doesnt matter if its not perfect or preciseit will still work for the purpose intended which is to assist you in removing your roses from your stick without putting your pastry bag down or fumbling for a pair of scissors. If youre using a reciprocating saw, you might cut (step 3) before you fold (step 2) but youll probably have more scratches. Otherwise, if youre using a jigsaw, you need to fold (step 2) first.
Secondly, you need to decide your preference as to how many roses that you want your pan to hold.
The production pros do it this way: 6 roses per row X 8 rows = 48 roses per pan every 5 minutes.
I do it this way: 7 roses per row X 11 rows = 77 roses per pan every 7-8 minutes. Since you probably dont make your roses huge and gaudy, youll be able to fit at least 77 on the pan. You could easily add a 12th row if you make them small-medium sized, but dont try to fit any more than 12 rows or you wont have enough of the unused paper portion at the top that youll need to get your 1st row started.
Thirdly, you need to decide how youre going to use your parchment pan liner on the pan (how it will stay there while you wipe or drag your completed rose on a stick into the V-shaped notch in the pan that is covered by the paper).
The production pros use a metal or stainless steel rod approximately 20 wide that has three spikes in the rod that holds the paper (you press the parchment pan liner onto the spikes about 1 1/2 down from the top edge of the paper. If you attach it at any point with fewer than the 1 1/2 inches recommended, youll risk the chance that the paper will rip and end up on the floor along with your first row of roses!) This metal rod rests in notches cut along the sides of the pan and you grab the center spike with one hand to move it up to the next notch (paper, roses, and all) preferably without needing to put your bag down to use both handswhenever youre ready to move on to the next available space on the paper.
This rod isnt really necessary unless you plan on making thousands of roses and see a need to have the rows spaced apart evenly. It is, however, extremely helpful for keeping your paper in place while making your first row... after that, the weight of the roses will keep the paper from falling off. There is hope! If you want to skip the rod and extra notches in pan sides to hold the rod, you can. Try taping the paper to the pan near the end of your newly-modified edge, use a paperweight, or a combination of both tape and the weighted tape dispenser! It should look something like this:
(notice that this pan doesnt have the notches cut into the pans sides
for the horizontal holding rod and you can see the see where the tape would be applied.)
Notch Note: Id recommend making an entire pan of roses before you decide how many notches to cut for horizontal rows or if you would rather skip that part altogether (less work, fewer saw cuts). Id highly recommend that you do consider to make at least a wooden replica of the metal rod and cut only the first horizontal notch to help hold the first row so that you can skip using tape or something weighted. (the wooden dowel wont do you any good without the notch, because it wouldnt be heavy enough itself to stay put.) Youll need the lower edge notches cut regardless, so decide how many, cut them, and get started! Youll get a feel for when the right time is to safely quit using the tape/weight by the time youve completed your second row for sure. Heres a photo of several rows of roses in progress:
You can use your rose pan just about anywhere on your counter, kitchen table, or over your kitchen sink... just keep in mind that it needs to hang off the edge for it to work properly especially if youre using it on a large work table that is deeper than the pan is.
At a large production facility, theyll bolt several of these pans to a stainless steel table for the rose-making station. If you choose to remove your completed full page of roses to transfer to a regular uncut pan instead of having several cut pans on hand, you would use this methodby yourselfwithout any assistance (but its not for the faint of heart!) Put one foot forward to use one leg/hip to hold and press the empty pan up against your thick-edged workspace table just slightly under the lip of your rose pan while keeping your other foot back a step, grab both lower corners of your pan liner sheet and pull it fairly swiftly onto the empty pan, transferring your weight to your back foot while remembering to keep forward pressure with your other leg/hip until you can release the paper and grasp the almost unsupported pan. It takes a little practice (only scary the first time), but no biggie if you mess up because if you lose it, hopefully it was only 5-8 minutes worth of work-time wasted! I wouldnt attempt this if your pan wasnt bolted to the table, but it can be done on your countertop as long as it extends beyond your cabinets so you can use that space to your advantage, otherwise your empty pan could end up flying underneath your rose pan during the attempted transfer.
(I actually have a better way to accomplish all of this, but I cant get into it right now... thats a whole nother story for another day and I need to get something more productive done today--like maybe sleep!)
I hope this helps enough to get you started for now. Enjoy!
WOW, thanks for all the information. You have really put a lot of thought into this. Good luck on your patent too.

My roses are terrible! When I use the nail the whole thing starts leaning after the first 2 or 3 petals! When I use the stick it starts to slide down after a few petals! What am I doing wrong? do I need a stiffer icing? One I had that was too stiff I couldn't even pipe it through without hurting my hand. So I added a bit of corn syrup and then it wouldn't stay on the stick! Any suggestions?
My roses are terrible! When I use the nail the whole thing starts leaning after the first 2 or 3 petals! When I use the stick it starts to slide down after a few petals! What am I doing wrong? do I need a stiffer icing? One I had that was too stiff I couldn't even pipe it through without hurting my hand. So I added a bit of corn syrup and then it wouldn't stay on the stick! Any suggestions?
I'd say you need stiffer icing, AND you should try using a larger rose tip... I use tip #124. Good luck. (going to repost the picture links that were deleted since I cannot edit it after 4 hours!)
I'm reposting this because the images were deleted. Sorry for the double posting, but apparently you can't edit your post after a 4 hour period.
(Edited to add new link to photos; apparently "progression" photos aren't allowed and were deleted, and added original first line of thread so followers would know where to click to see the video if they didn't read the entire thread!)
I wrote: "Click on my signature if you'd like to see "How To: make bc roses on a stick". This is my way, I roll the last row because it's faster and I can complete 50 in 5 minutes including refilling the bag (gotta be productive!). Of course, you can try it slower while trying to keep each petal separated, but the rolled part isn't very noticable after the leaves are added.
I hope this helps a lot of businesses that are looking for more productive ways to work, or anyone who's afraid to take orders for cakes with lots of roses!"
In response to your questions... no, I dont use scissors to take the roses off the stick. Its not the most productive way if you have to put your bag down to grab another tool (the scissors) to run up the nail/stick and then use another step to wipe it off the scissors. The name of the game is to NOT need to let go of your bag and nail/stick.
I know... I should have shown where I was putting them (not in my mouth! Ha!), but I was trying to avoid that for a reason. (If I show you all of my secretsI keeeeeel you!) I use several custom-fabricated pieces of equipment for speed and ease. Im working with a patent lawyer and fabricators to mass produce an entirely different item but still within the cake industry and had planned to include a free demonstration of how to make 600 roses per hour with each purchase.
I dont think its any big secret how to be like a machine and make roses fast if you figure out how to use your tools and equipment to your advantage, so Ill spill the beans. (Ill try to make another videobut for now, Ill explain what you can do.)
If you use a styrofoam plate and it works for youthats great, its a good idea or concept, but its not the most productive way since you not only need to put your bag down, but you also need to use both hands; one to pick up the plate with, and the other to thread the nail/stick through the plate with. I guarantee you that production line facilities dont use styro plates for thisthey use full size sheet cake pans for everything and store the pans on pan racks or in enclosed cabinets.
Youll need:
1=Full size BUN sheet cake pan (approx. 18 x 24)
?=Bakery pan liners (parchment-type paper)
1=Optional 20 custom-fabricated metal rod with three 1-2 spikes
or Optional 20 custom-fabricated wooden rod with three 1-2 hardware nails
First of all, you need to modify one of your full size BUN pans by
1.) cutting off two corners,
2.) folding down the entire edge of that end of the pan, and
3.) cutting notches out of the lipped area up to the bend like this:
(Can you see that the corners are gone and can you tell that the notches
are cut into the rolled lip edge that used to be up as in one of the pan walls?) 
(before you cut the notches, read the Notch Note below.)
It doesnt matter if its not perfect or preciseit will still work for the purpose intended which is to assist you in removing your roses from your stick without putting your pastry bag down or fumbling for a pair of scissors. If youre using a reciprocating saw, you might cut (step 3) before you fold (step 2) but youll probably have more scratches. Otherwise, if youre using a jigsaw, you need to fold (step 2) first.
Secondly, you need to decide your preference as to how many roses that you want your pan to hold.
The production pros do it this way: 6 roses per row X 8 rows = 48 roses per pan every 5 minutes.
I do it this way: 7 roses per row X 11 rows = 77 roses per pan every 7-8 minutes. Since you probably dont make your roses huge and gaudy, youll be able to fit at least 77 on the pan. You could easily add a 12th row if you make them small-medium sized, but dont try to fit any more than 12 rows or you wont have enough of the unused paper portion at the top that youll need to get your 1st row started.
Thirdly, you need to decide how youre going to use your parchment pan liner on the pan (how it will stay there while you wipe or drag your completed rose on a stick into the V-shaped notch in the pan that is covered by the paper).
The production pros use a metal or stainless steel rod approximately 20 wide that has three spikes in the rod that holds the paper (you press the parchment pan liner onto the spikes about 1 1/2 down from the top edge of the paper. If you attach it at any point with fewer than the 1 1/2 inches recommended, youll risk the chance that the paper will rip and end up on the floor along with your first row of roses!) This metal rod rests in notches cut along the sides of the pan and you grab the center spike with one hand to move it up to the next notch (paper, roses, and all) preferably without needing to put your bag down to use both handswhenever youre ready to move on to the next available space on the paper.
This rod isnt really necessary unless you plan on making thousands of roses and see a need to have the rows spaced apart evenly. It is, however, extremely helpful for keeping your paper in place while making your first row... after that, the weight of the roses will keep the paper from falling off. There is hope! If you want to skip the rod and extra notches in pan sides to hold the rod, you can. Try taping the paper to the pan near the end of your newly-modified edge, use a paperweight, or a combination of both tape and the weighted tape dispenser! It should look something like this: 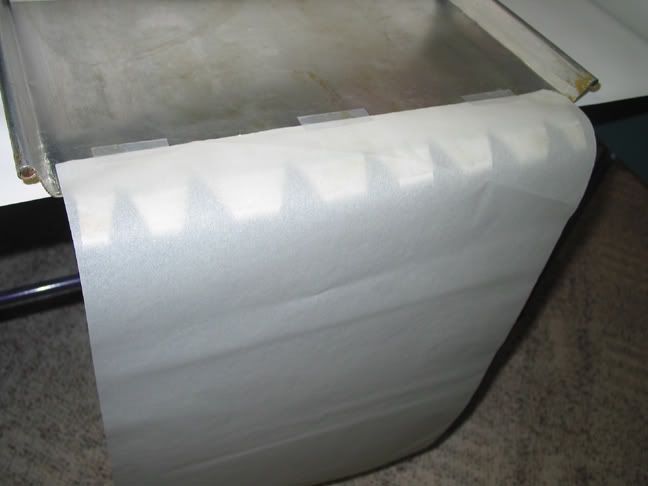
(notice that this pan doesnt have the notches cut into the pans sides
for the horizontal holding rod and you can see the see where the tape would be applied.)
Notch Note: Id recommend making an entire pan of roses before you decide how many notches to cut for horizontal rows or if you would rather skip that part altogether (less work, fewer saw cuts). Id highly recommend that you do consider to make at least a wooden replica of the metal rod and cut only the first horizontal notch to help hold the first row so that you can skip using tape or something weighted. (the wooden dowel wont do you any good without the notch, because it wouldnt be heavy enough itself to stay put.) Youll need the lower edge notches cut regardless, so decide how many, cut them, and get started! Youll get a feel for when the right time is to safely quit using the tape/weight by the time youve completed your second row for sure. Heres a photo of several rows of roses in progress: 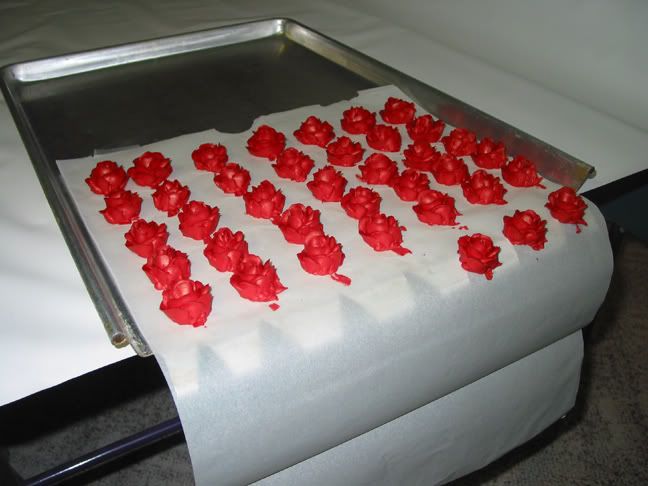
You can use your rose pan just about anywhere on your counter, kitchen table, or over your kitchen sink... just keep in mind that it needs to hang off the edge for it to work properly especially if youre using it on a large work table that is deeper than the pan is.
At a large production facility, theyll bolt several of these pans to a stainless steel table for the rose-making station. If you choose to remove your completed full page of roses to transfer to a regular uncut pan instead of having several cut pans on hand, you would use this methodby yourselfwithout any assistance (but its not for the faint of heart!) Put one foot forward to use one leg/hip to hold and press the empty pan up against your thick-edged workspace table just slightly under the lip of your rose pan while keeping your other foot back a step, grab both lower corners of your pan liner sheet and pull it fairly swiftly onto the empty pan, transferring your weight to your back foot while remembering to keep forward pressure with your other leg/hip until you can release the paper and grasp the almost unsupported pan. It takes a little practice (only scary the first time), but no biggie if you mess up because if you lose it, hopefully it was only 5-8 minutes worth of work-time wasted! I wouldnt attempt this if your pan wasnt bolted to the table, but it can be done on your countertop as long as it extends beyond your cabinets so you can use that space to your advantage, otherwise your empty pan could end up flying underneath your rose pan during the attempted transfer.
(I actually have a better way to accomplish all of this, but I cant get into it right now... thats a whole nother story for another day and I need to get something more productive done today--like maybe sleep!)
I hope this helps enough to get you started for now. Enjoy!
Unlimited, are you able to share what recipe you use for your roses? If you'd rather PM it to me that's fine too.
The two recipes I've used for roses is the Wilton buttercream using all shortening, no salt or syrup and a slightly different version with salt and lemon juice. Does this matter? Thank you for your input!
Sorry... no secret recipe required. Use any buttercream, stiffen a bit with extra powdered sugar if necessary, thin with a little water if too stiff.
I don't believe it matters what type of buttercream you use as long as it's not too soupy.

Thanks for the tutorial. What is the sound off camera after each rose? Do you have lots of sticks, or are you sliding the roses off? I will have to try this soon!
i believe she is sliding the roses off using those notches in her customized pan.
Unlimited - correct me if I'm wrong.
Thanks for the tutorial. What is the sound off camera after each rose? Do you have lots of sticks, or are you sliding the roses off? I will have to try this soon!
Here is is: Thirdly, you need to decide how youre going to use your parchment pan liner on the pan (how it will stay there while you wipe or drag your completed rose on a stick into the V-shaped notch in the pan that is covered by the paper).
I thought I used the word "wipe" in there somewhere! The sound is the paper. I used the same stick and slide it off as described above. Wishes for much success!
Thanks for the tutorial. What is the sound off camera after each rose? Do you have lots of sticks, or are you sliding the roses off? I will have to try this soon!
i believe she is sliding the roses off using those notches in her customized pan.
Unlimited - correct me if I'm wrong.
You are absolutely correct!
Is there a video which actually shows the removal of the rose from the stick to the notched pan?
Unlimited:
Just wanted to thank you so much for taking the time to do the videos and put up the explanation for the rose thingie. (Feel free to use Rose Thingie as the name for your patented design. ![]() )
)
I'm still learning so much and trying to take in as much information as possible. People sharing the way you do makes things so much happier for the rest of us just learning. Maybe someday we will know enough to pass on our words/videos of wisdom.
Thank you!
Quote by @%username% on %date%
%body%