


Hello!
I am sorry, when I took photos I wasn't thinking about a tutorial so I missed a few things, but I am sure you will all be able to understand enough to experiment!
Supplies:
tips. Wilton #47 (small basket weave)
Lots of icing bc ( I love Sugarshack!)
Colors of choice
1 inch dowel
screws
washers
1/2 inch foam core
1/4 inch foam core
Rice krispy treats
Plunger measuring cup (2 cup size)
styrafoam
bubble tea straws
skewers
1/4 dowel
rasp
Step 1:
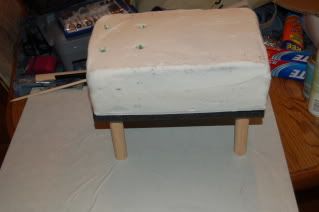
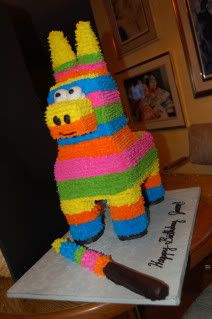
Decide how many servings you need. I needed 50 So I made a 2 layer 9X13 cake. This is going to be the body of the pinata. I iced and crumb coated on 1/4 inch foam core, 9x 13.
Cut a 1/2 foam core board (make sure its thick if you use cardboard) to 9x13.
Step 2:
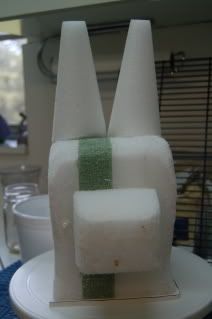
Cut dowels into "legs." Using my dads chop saw made quick and accurate work of this ![]() Glue strafoam (with styrafoam glue) together and carve basic shape (using a rasp) for head. I used cones and trimmed them down for the ears, the foam rectangles were cheaper and closer in size and I used excess to make the nose. Ears, and nose were glued and skewered.
Glue strafoam (with styrafoam glue) together and carve basic shape (using a rasp) for head. I used cones and trimmed them down for the ears, the foam rectangles were cheaper and closer in size and I used excess to make the nose. Ears, and nose were glued and skewered. 

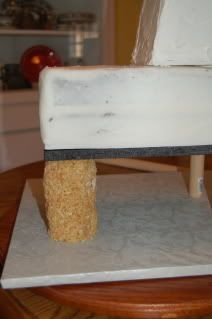
I predrilled the dowels for the screws so it wouldn't split. keeping in mind the diameter of the legs, attach the 1/2 board to the wooden legs, using a washer so it does not punch through the foam core. Cover the cake board and then attach the support to the board. Make sure your board is strong! I used 1/2 foam core and really pushed it.... 

Place the iced cake on the support (I glue this down!). Cut bubble tea straws for head support.
Step 3:
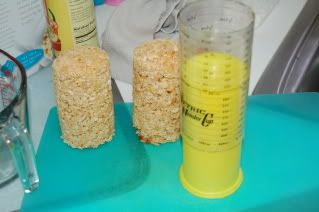
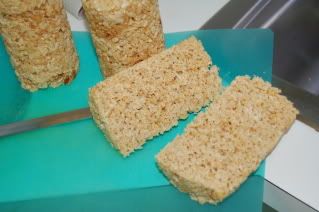
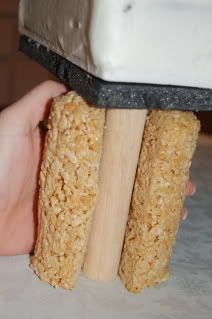
Make the rice krispy treats. I used my pampered chef kitchen plunger. Spray with Pam cooking spray and then drop in the RKT. Smoosh the plunger and voila! a leg ![]() Let cool alil and then cut in half and shape around the dowel. Shape legs and add RKT as needed.
Let cool alil and then cut in half and shape around the dowel. Shape legs and add RKT as needed. 


Step 4:
Place head on cake and use 1/4 inch dowel to support. Crumb coat cake. 
Step 5:
Decorate!
I used the smooth side of tip #47 to do the black hooves. Then I used the jagged side to make the individual "tissues". slowly around the cake, pulling out to make it look kinda fluffy. I actaully think tip 48 might have worked better.. oh well. I used a ruler to mark my crumb coat into sections. (The insides of the legs are a PITA!!) Add eyes, nostrils and mouth. I used 5 different colors of curling ribbon and attached it to a skewer for the tail.
"Stick" is left over 1 inch dowel covered like cake.


I hope this helps! If you have questions just let me know ![]()
For the record this was a Chocolate cayanne and cinnamon cake with a dulce de leche bc filling![]()

What a great idea! Thank you so much for sharing!
ahhh! I posted it in my photos but not here.......... inspiration from Bellawest (flickr).
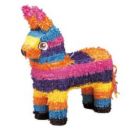
Here is the real pinata I used for inspiration..
and a link to bellawest's tutorial... similar, but she used all cake! What a feat.
www.slashfood.com/photos/pinata-cake/787197/


Re-posting with photos that work!
Hello!
I am sorry, when I took photos I wasn't thinking about a tutorial so I missed a few things, but I am sure you will all be able to understand enough to experiment!
Supplies:
tips. Wilton #47 (small basket weave)
Lots of icing bc ( I love Sugarshack!)
Colors of choice
1 inch dowel
screws
washers
1/2 inch foam core
1/4 inch foam core
Rice krispy treats
Plunger measuring cup (2 cup size)
Styrofoam
bubble tea straws
skewers
1/4 dowel
rasp
Step 1:
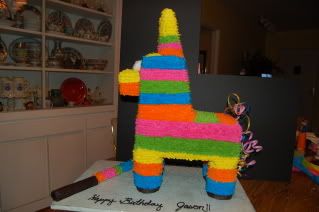
Decide how many servings you need. I needed 50 So I made a 2 layer 9X13 cake. This is going to be the body of the pinata. I iced and crumb coated on 1/4 inch foam core, 9x 13.
Cut a 1/2 foam core board (make sure its thick if you use cardboard) to 9x13.
Step 2:
Cut dowels into "legs." Using my dads chop saw made quick and accurate work of this ![]() Glue Styrofoam (with Styrofoam glue) together and carve basic shape (using a rasp) for head. I used cones and trimmed them down for the ears, the foam rectangles were cheaper and closer in size and I used excess to make the nose. Ears, and nose were glued and skewered.
Glue Styrofoam (with Styrofoam glue) together and carve basic shape (using a rasp) for head. I used cones and trimmed them down for the ears, the foam rectangles were cheaper and closer in size and I used excess to make the nose. Ears, and nose were glued and skewered. 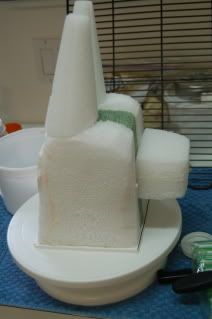
I pre-drilled the dowels for the screws so it wouldn't split. keeping in mind the diameter of the legs, attach the 1/2 board to the wooden legs, using a washer so it does not punch through the foam core. Cover the cake board and then attach the support to the board. Make sure your board is strong! I used 1/2 foam core and really pushed it.... 
Place the iced cake on the support (I glue this down!). Cut bubble tea straws for head support.
Step 3:
Make the rice krispy treats. I used my pampered chef kitchen plunger. Spray with Pam cooking spray and then drop in the RKT. Smoosh the plunger and voila! a leg ![]() Let cool alil and then cut in half and shape around the dowel. Shape legs and add RKT as needed.
Let cool alil and then cut in half and shape around the dowel. Shape legs and add RKT as needed. 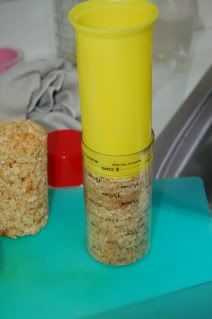
Step 4:
Place head on cake and use 1/4 inch dowel to support. Crumb coat cake. 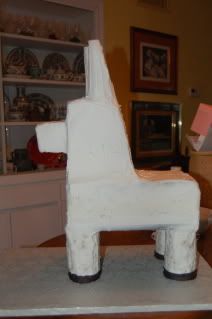
Step 5:
Decorate!
I used the smooth side of tip #47 to do the black hooves. Then I used the jagged side to make the individual "tissues". slowly around the cake, pulling out to make it look kinda fluffy. I actaully think tip 48 might have worked better.. oh well. I used a ruler to mark my crumb coat into sections. (The insides of the legs are a PITA!!) Add eyes, nostrils and mouth. I used 5 different colors of curling ribbon and attached it to a skewer for the tail.
"Stick" is left over 1 inch dowel covered like cake.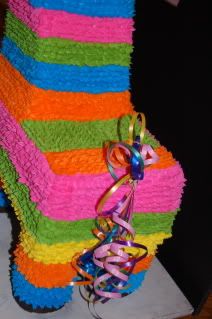
I hope this helps! If you have questions just let me know ![]()
For the record this was a Chocolate cayenne and cinnamon cake with a dulce de leche bc filling![]() [/quote]
[/quote]

 I can't wait to make it!
 Quote by @%username% on %date%
%body%