

Can anyone post directions on how to make cowboy boots
I did that and have not received anything as of yet

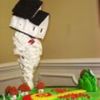
Here are the instructions for my Cowgirl Boots...
Cowgirl Boots
To make the heel and sole, you will need cardboard and a block of wood measuring 3âwide x 4â long x 2â tall (I cut and glued two together to make it 2â tall). On the block of wood trace, measure, or freehand the bottom side of the heel on one side of the wood; then freehand the top of the heel onto the top side of the block of wood. Now is the tricky partâ¦if you are a good woodworker, this is probably a piece of cake(no pun intended)LOLâ¦you can either cut this out with a jigsaw, or use a chop saw that you can set on angle, then sand to smooth. You could also use Styrofoam or several layers of cardboard glued together.
Trace or draw the sole (part of boot from toe to heel) on a piece of cardboard. (Draw on the cardboard so that the corrugation in the cardboard runs from side to side of the sole. This enables you to bend the cardboard more easily). Glue the back edge of the sole to the edge of the heel and leave to dry. When the glue is dry, bend the cardboard so that it resembles a sole with the foot part touching the counter and the toe slightly off the counter. Then cover entire sole/heel with colored gumpaste (I painted mine). You may need to use something to hold pressure on the sole at this point so that it keeps its shape until it is completely dry. Once the gumpaste is completely dry, drill two ¼â holes into the top of the heel about 2â apart being careful not to drill all the way through, just about ½â deep (these will be used to insert 3/8â dowel rods to keep the boot upright).
Out of parchment paper you need a template 3/8â smaller than the actual size of your sole/heel for the front (foot) part of the boot and for the leg of the boot( an oval âaroundâ shape not an up and down shape). Another parchment paper template needs to be made tracing the entire foot and heel (this will be a barrier between sole/heel and cake). Apply this template with piping gel. Also, you will need to cut cardboard separators in the shape of the leg of the boot for every 2 layers of cake (2 for each boot). To make this easier and lighter, I used straws for support instead of dowels between the layers.
I used oval pans for my cake, but any size will do. Not sure how much cake you will need, as I made too much. Just eat the leftovers. LOL
For the cake, I cut one piece covering the entire surface of the sole/heel about 1 ½-2â thick. I added extra on top for the top of the foot and ankle area and cut some off at an angle of the toe area. Once I got the foot and ankle area looking right, I started cutting out for the leg. Using your template, cut out approx. 5-2â layers, stack using filling and cardboard, crumbcoat and freeze for awhile. After frozen, you should be able to hammer your dowels through all layers (& cardboard), make any minor adjustments to your cake & hammer dowels into the heel. Crumb coat everything that is left and refrigerate.
Fondant covering:
Once again, use parchment paper to make templates to cut out your fondant. I cut my pieces out as follows: back half of the boot leg, front half of the boot leg, back part of the heel, the rest of the front (toe to ankle).
For the front and back of the boot legs, roll out the fondant, cut to shape, then lay fondant piece on plastic wrap and fold wrap over to encase fondant piece to keep it from drying out while you mark your cut outs and other details. Trace the cut out with a gumpaste tool, toothpick or the like. After tracing, open the plastic and cut out pieces with an Exacto knife. I used a tracing tool used for sewing to make the marks for stitches (I painted over these stitches once the fondant was all placed with a food coloring gel/extract mixture). You must work quickly once you roll out your fondant as it will dry out and start to crack. I controlled this a little by rubbing shortening all around the edges, but it still cracked a little. Roll out the brown pieces and apply to cake. Use the tracing tool to make stitch marks on top of the foot part then paint. Make fondant âsnakesâ for the binding on the sides and top of the boots. Also cut out fondant âpullsâ to place on top.
Some of these instructions will depend on the type of boot your may or may not be replicating. I had an actual boot to look at!!
And youâre done!!! I truly hope that these instructions are detailed enough for you to make your ownâ¦If you have any questions, please contact me and I will do my best to give you a good answerâ¦
ccathy1956...I have also pm'd them to you...sorry for the delay, I couldn't get on this website yesterday afternoon...happy baking!!!
Quote by @%username% on %date%
%body%